
Maulik Pandya
Ahmedabad, Ahmadabad
You have no groups that fit your search
Maulik Pandya
1 year ago
Top 10 Profitable Ecommerce Business Ideas to Try in 2022

There is no shortage of ecommerce store business ideas in the world. But how to tell which ones are valuable and which ones aren’t? It can be challenging to tell. An online store has many potential consumers, with over 2.14 billion people worldwide buying things online. For those looking for the best source of money, it makes it a viable endeavor. Keep reading if you’re unsure which ecommerce business ideas are worth considering.
How to Build an Online Store?
In today’s world, starting an eCommerce business has never been simpler. You can get one up and running in minutes even if you don’t have any design, coding skills, or expertise. A domain name, website hosting, and an ecommerce website builder are all you’ll need.
It’s due to the development of website builders, of which there are a lot. The most popular website builders don’t require any prior coding or website design knowledge. They do, however, have high prices.
Top 10 eCommerce Business Ideas to Try
There are several reasons why having business related to e-commerce companies makes sense and provides you with a vast customer base. Ecommerce sales, for example, expect to account for 21.8 percent of all retail sales by 2024. These figures demonstrate that ecommerce is rapidly becoming a critical factor in the global commerce sector. So, without further thought or care, here are ten of the most promising ecommerce business ideas for 2022.
1. Beauty and Health Products
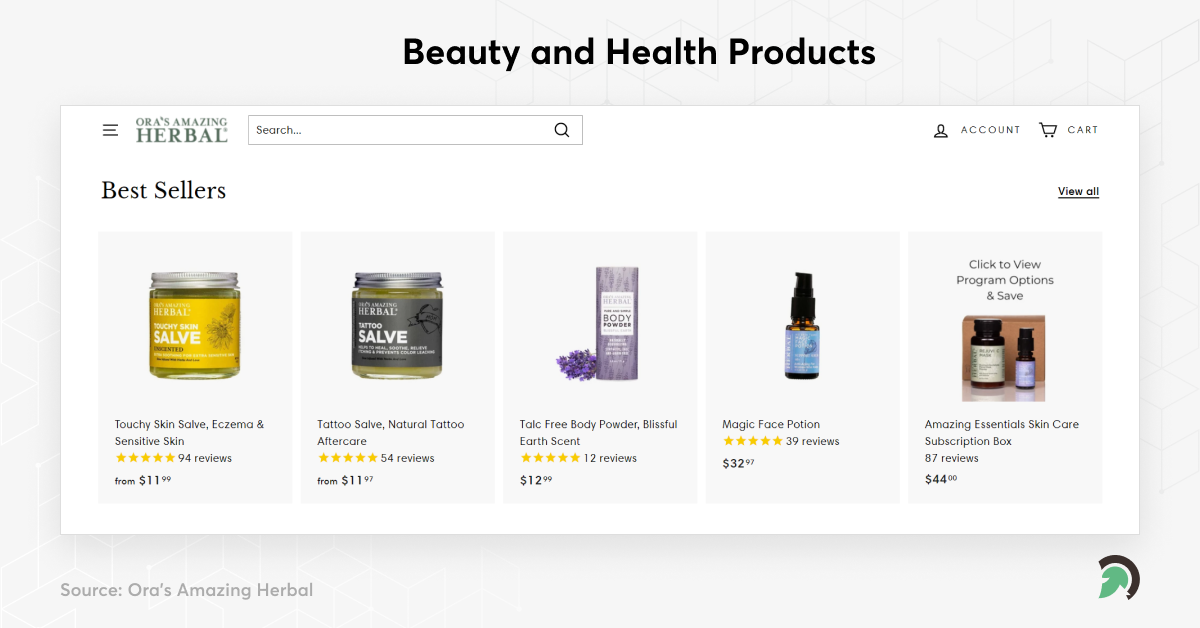
The beauty and health sectors are some of the most profitable in the world. Even with all of these business-to-business e-commerce stores ideas out today, it is still quite lucrative. It is a beautiful concept for young individuals who are professionals in ecommerce marketing. Your chances of success are great as long as you can express the relevance of the items you’re selling in people’s lives.
2. Selling Second Hand Products
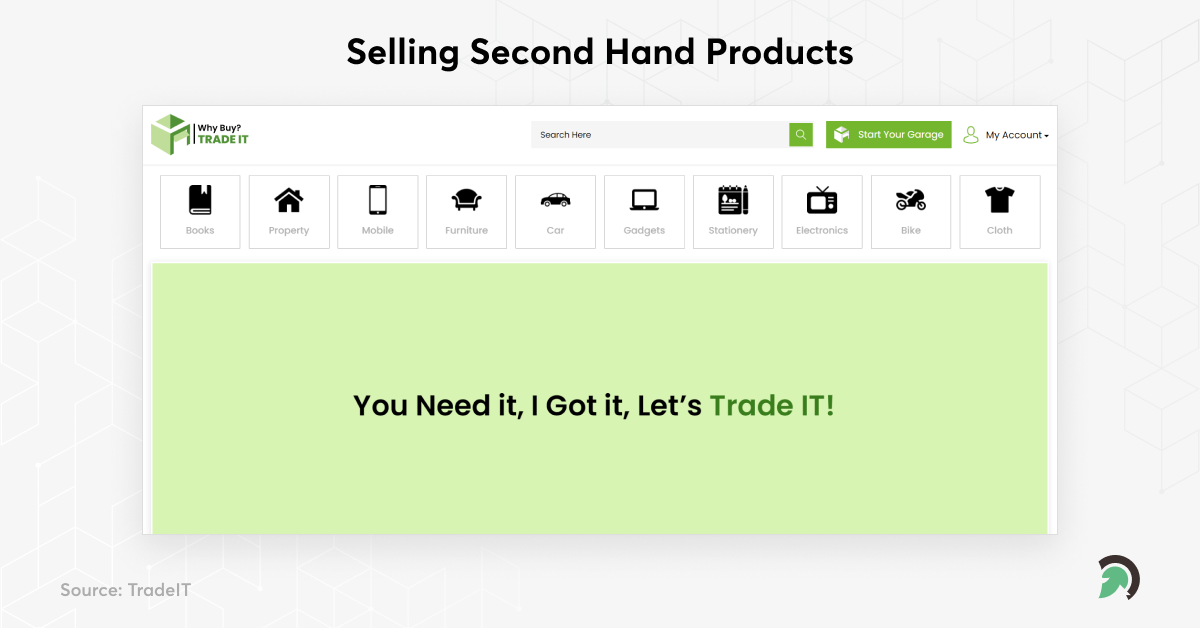
People have no problem buying used products as long as they are of excellent quality and great condition. You have to start collecting used goods like clothing, jewelry, and furniture and listing them on your ecommerce website. You should make sure that you are charging appropriate pricing for them. Before increasing your reach, you may start by seeing how well this idea works locally.
3. Smart Watches
![eCommerce business idea - JIRDUNN
Smart Watches
]
@
(](https://contents.bebee.com/users/id/BBny662bd7f5dada42/post/UjarO62d5640f6675a/jzACF.png)
People demand more than just analog and digital watches these days, and intelligent wear is the trend. Smartwatches are helpful for a variety of purposes, including fitness and day planning. They’ve risen in popularity to the point that sales in 2019 did anticipate exceeding $68.6 million. As a result, they’re one of the best ecommerce business ideas to consider.
4. Smart Home Products
The Internet of Things (IoT) has progressed dramatically. People enjoy having all of their gadgets connected to communicate with one another and anticipate their requirements. Coming home from the office and opening the garage door, for example, should cause the air conditioner to switch on. If you’re stressed, it should also tell your smart speaker to play some soothing music. The mood tracker software on your smartphone might help you figure out how much stress you’re experiencing.
As you can see, the Internet of Things enables you to develop a smart home. Few individuals offer these gadgets online despite the IoT’s promise and the public’s enthusiasm for the technology. Finally, it is one of the most innovative online commerce business concepts. It provides you with the possibility to earn from the sale of these items.
5. Online Educational Courses

Many great businesses and teachers across the world have the necessary expertise to offer. You can also develop online stores where these people may design and sell courses. While several online platforms provide courses, there is a lot of demand. There are so many different disciplines, specializations, and professions that no single platform can cover them all. It is your own opportunity to provide people with instructive information that they won’t find anywhere else.
There are several ecommerce business ideas available nowadays. Some are valuable to pursue, while others are not. It is up to the smart business owner to conduct research and determine which ones to execute. As you can see, you may sell a wide range of items (nearly anything) online, from health and beauty items to children’s toys and games. One of the great delights and perks of living in the internet age is the ability to open an online business, and you may earn tremendously from it.
So, if your business doesn’t currently have a mobile app, it’s not too late to have an eCommerce app. EvinceDev, a Top Ecommerce App Development company, can understand your needs and provide you with a viable solution.
| Read here originally published blog:
0 likes · 0 comments
Science and TechnologyMaulik Pandya
1 year ago
Top 8 Little Changes That’ll Make a Big Difference with Your eCommerce Website Redesign

Design is essential when you need to stand out to thrive in today’s world. You’re now selling the user experience rather than the product. As a result, if your website does not appear modern and is challenging to navigate, your prospective customers will go elsewhere.
Conversely, not all businesses are aware of this. Most eCommerce sites use design templates, and it’s simple, inexpensive, and generally work well.
If you want to make a special connection with your customers and build a loyal following, you’ll need to devote time, money, and effort to the design.
How can you tell if your eCommerce site needs to be redesigned? How does it set you back? What are the crucial stages of redesigning an eCommerce website? In this article, we’ll cover these topics.
Stats About User Experience, Website First Impressions, and Website Design That You Should Be Taking Very Seriously
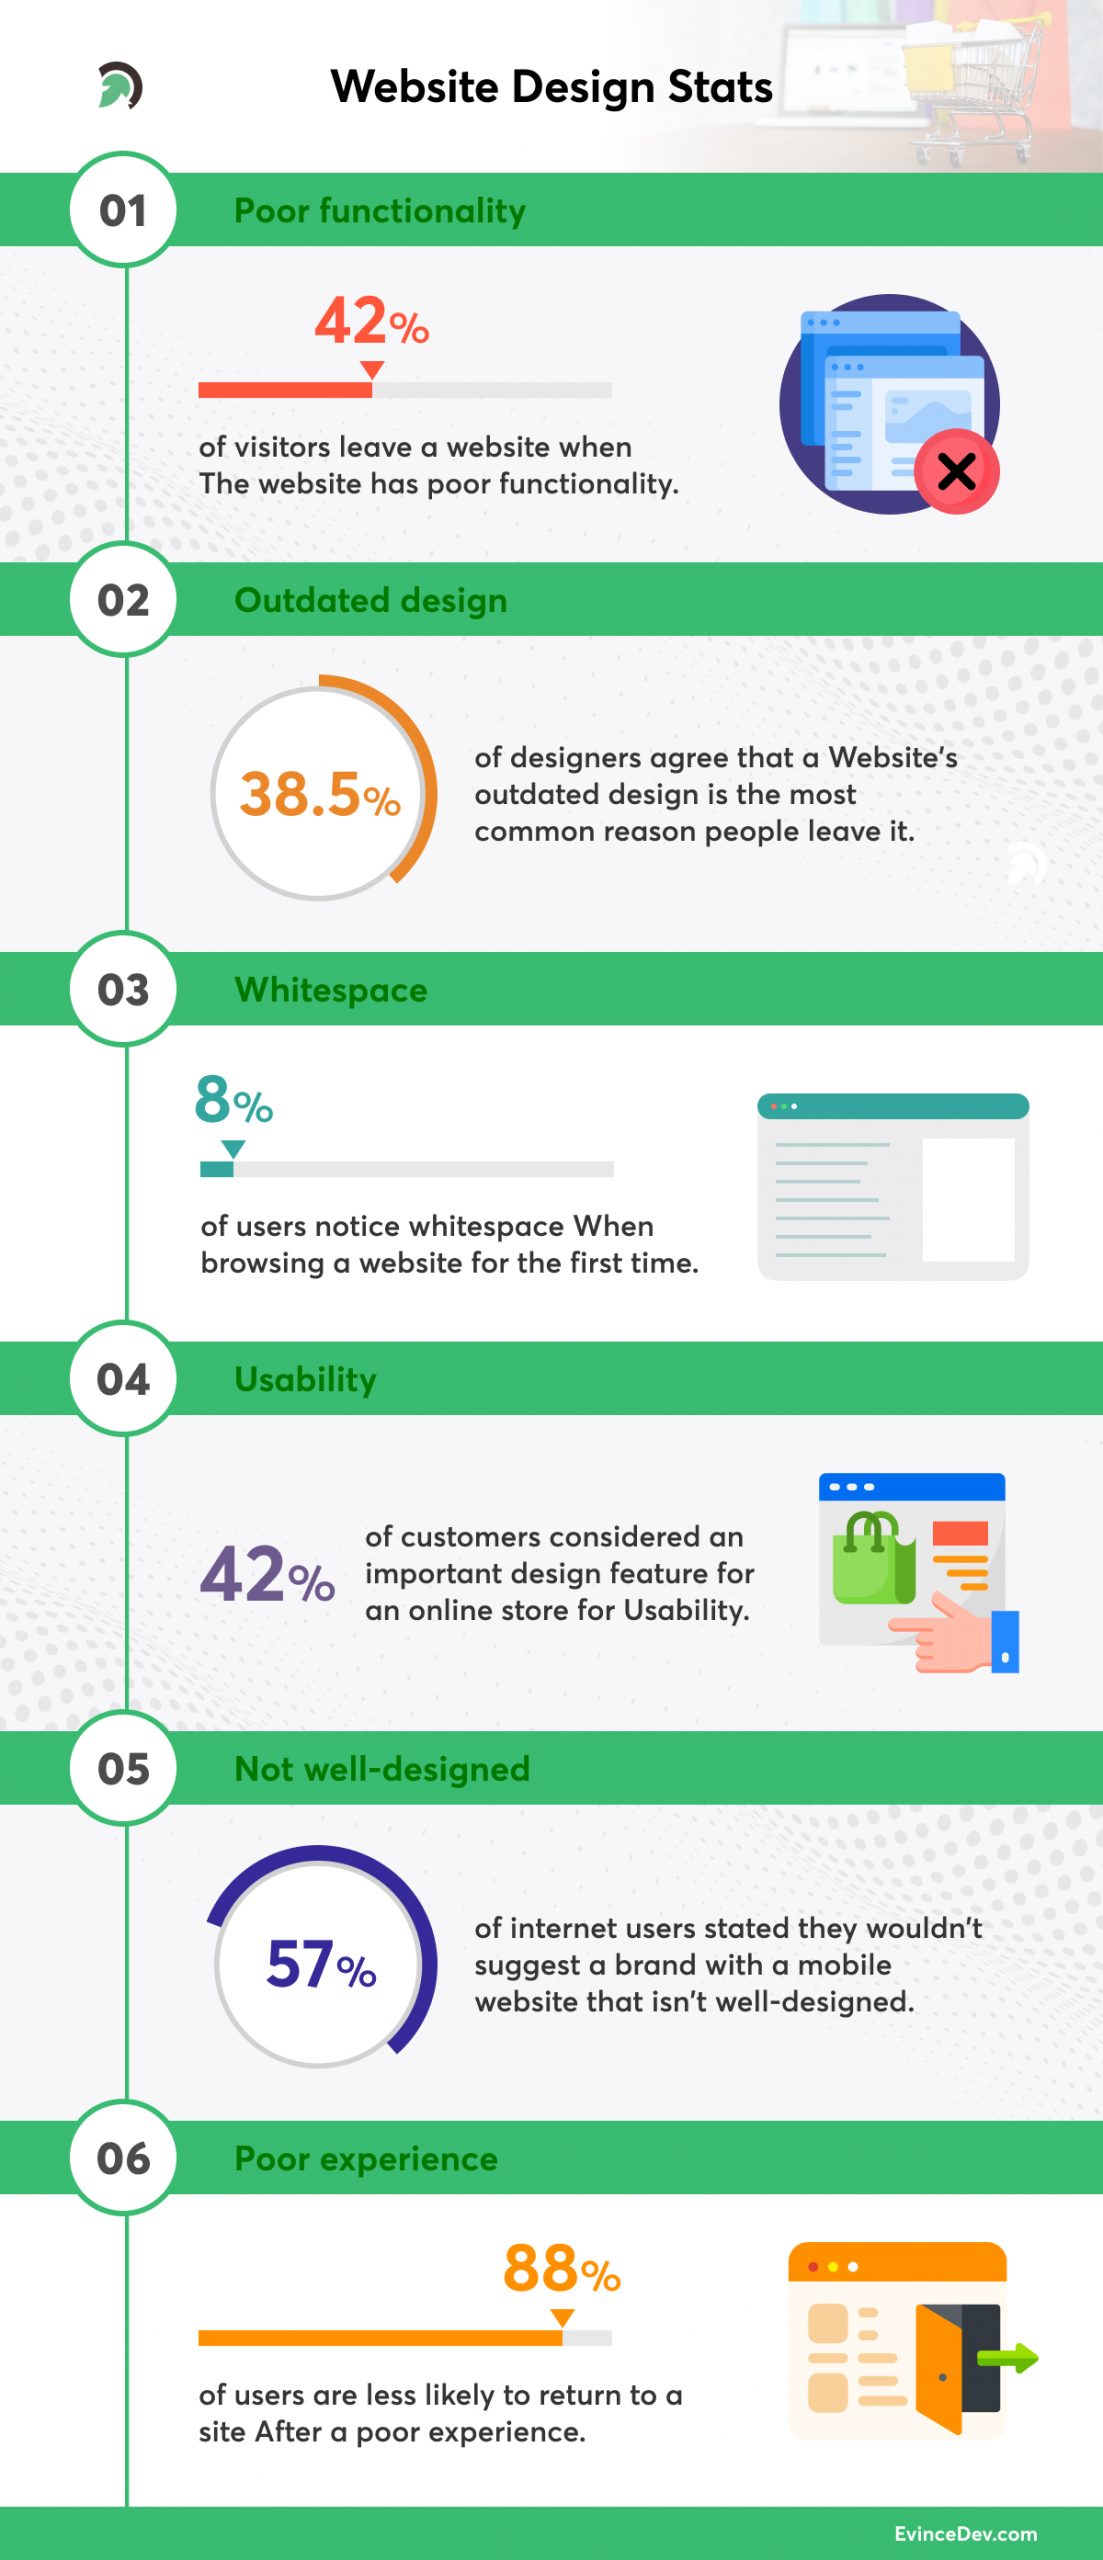
- A website’s poor functionality drives 42% of visitors to leave it.
- 38.5% of designers agree that a website’s outdated design is the most common reason people leave it.
- When browsing a website for the first time, just 8% of users notice whitespace.
- Usability is considered an important design feature for an online store by 60% of customers.
- 57% of internet users stated they wouldn’t suggest a brand with a mobile website that isn’t well-designed.
- After a poor experience, 88% of users are less likely to return to a site.
Why does your eCommerce website need Website Redesign?
![Why do you Need of eCommerce websites Redesign - »
Need of eCommerce
websites Redesign
R
Low Sales
‘a
Low Speed
L
Struggle with
Mobile Navigation
a
J
Website Security
comprised
v
Less Conversion
Old Design
Failed to meet
Accessibility Standards
UX on the website is
(LIT [aTe]
SLT oR](https://contents.bebee.com/users/id/BBny662bd7f5dada42/post/tund662d1315b35178/VKWVJ.jpeg)
1. Low Sales
A design flaw causes plenty of issues that limit sales, and Website visitors may become frustrated by lackluster performance, diminishing their chance of converting. You’ll like to rule out other aspects that could significantly impact before moving forward with a redesign.
It’s feasible that the products themselves, or their marketing, are to blame. Price may also be a consideration, especially if a competitor’s offering is less expensive. Determine the level to which a redesign can increase sales by identifying the most serious issues as soon as possible.
2. Less Conversion
A low conversion rate indicates that your eCommerce platform is not profitable to start successfully, and you should fix this issue as a result. So, if you’re having trouble converting website visitors into customers, you might want to explore a webshop redesign.
The conversion rate is directly influenced by your platform’s complex interface, poor design, low functionality, and poor performance. But don’t worry; an eCommerce redesign can help you solve this problem by providing your Website more user-friendly and enticing.
3. Low Speed
If they have to wait a few moments longer than expected, most people will quit websites. A slow website might be a significant liability. Make every attempt to meet the standard rule of thumb for a good load time of fewer than two seconds.
First, see if your page is taking too long to load. Using various tools, such as Google PageSpeed Insights, may analyze your page performance.
4. Old Design
When building an eCommerce website, failing to consider your target audience might negatively impact the user experience. As a result, thorough market research and identification of your target audience are essential for an updated design.
5. Struggle with Mobile Navigation
If your page isn’t built to suit the mobile shopping revolution, you miss out on an increasing audience. Many buyers will not make purchases from websites that have not been designed with mobile in mind.
When developing your mobile site, keep in mind that web pages must automatically resize to match various devices’ screens. Users are less likely to have to zoom in and scroll while using a responsive website constantly. You must also maintain consistency between desktop and mobile versions of your Website.
6. Website Security comprised
Customers would like to know that the Website should process their data with care. Therefore, security should be a key focus in eCommerce web design and security work hand in hand, primarily if possible risks are handled.
Transparency is also essential. All users should know how your Website adheres to privacy rules and when and why their data is gathered.
7. UX on the Website is confusing.
You might wonder what the primary indicators of a complex UX are. The following is a list of its essential indications. You should consider an eCommerce website redesign if your Website relates to two or more of these factors.
- It takes a long time for the page to load or react;
- The plugins aren’t well-integrated.
- Confusing navigation or several possibilities for navigating;
- The lengthy checkout procedure (there are so many stages);
- There is the insufficient spacing between informative blocks;
- The unavailability of a “search” option;
- Fonts that are too complex;
- The colors on the page don’t match.
How much does it cost to hire someone to redesign a website?
When it pertains to a website redesign process, prices vary greatly. Some redesigns are minor adjustments, while others are total overhauls. Are you redesigning your entire site or just very few pages? What’s the size of your Website, after all? The more you modify, the more time and money it will cost you.
It’s critical to consider both the upfront cost and the future cost of not redesigning your site when considering a website redesign. Assume you believe that a poor design is affecting your conversions or recurring business.
Hiring an eCommerce website development company to handle your website redesign is ideal for overcoming these challenges. It offers you access to a group of seasoned professionals who have likely worked with goals similar to yours and designed websites around them.

A website redesign with a company, on the other hand, will cost the most. A simple website redesign may cost anywhere from $15,000 to $30,000, based on the scale of the site, but websites with a large number of pages, special features, and more specific requirements might cost anywhere from $40,000 to $75,000 or even more.
However, working with an eCommerce web design company entails a lot more than just design. They devote the same amount of time to content, user experience, conversion rate optimization, and everything else that enables your Website to be a great asset to your business to achieve your goals.
How long does it take to redesign a website?
A range of factors can drive a website redesign project’s timing. If you pay for a customized website design, you should estimate it to take 3-4 months to finish.
Writing and producing content for a new website is a frequent problem for customers, and it can create project delays. Working with a web agency that spends more time on the project’s strategy and content mapping stages is beneficial as you, as the client, will have more direction on what information will be required for the new site.
How often should you redesign your Website?
Whereas an eCommerce website redesign project is significant for a company and its entire staff, you wish to get it right the first time. Every 3 to 5 years, most businesses will redesign their whole Website.
However, it depends on what is going on in your company and industry. The great news is that today’s internet systems are far more adaptable, and you don’t have to rely till your next Redesign can make changes and upgrades on a WordPress site.
Summing up the Story
As you can see, determining when to redesign a website is not easy. All eCommerce companies will eventually require minor modifications and, in some cases, a total redesign. Targeted changes may make your page more manageable and pleasurable to use when that time comes while increasing consumer interaction.
These improvements will work to help you resolve issues that previously impeded conversions. Don’t pass up this chance to increase your bottom line while serving your customers better. Hire a Top Website redesign company for custom eCommerce development.
| Read here original blog : Top Changes That’ll Make a Big Difference with Your eCommerce Website Redesign
0 likes · 0 comments
Science and TechnologyMaulik Pandya
1 year ago
How React Native App Development Technology is Quick & Cost-effective?

The new age of technology is witnessing the burgeoning usage of smartphones worldwide. If we take a closer look at the data, there are over 2.87 billion smartphone users & 1.26 billion tablet users globally. One can easily foresee how bright the future of the mobile application industry is. With high potential, the industry also holds a great competition. To ace in the market & be profitable, one has to be dynamic and geared with the latest technology unequivocally. There are multiple technologies available for mobile application development that can make business’ presence lucrative & cost-effective. One such advanced technology for mobile application development is React Native.
Let’s dive in to learn what is React Native
Facebook’s invention React Native, is an open-source mobile application development framework that is used for iOS, Android, and Web applications. The technology came into existence in 2013, and in just a couple of years, it was ranked the fastest-growing open-source platform with over 30,000 stars on GitHub. Also a year later, Facebook and Microsoft established a partnership, thereby adding Windows support to the React Native platform. According to a survey by Markets and Markets, cross-platform development is exponentially increasing, and it is estimated to generate 80.45 billion dollars in the year 2020. This success picture depicts that more and more developers and startups are choosing to React Native technology for mobile app development.
Popular Apps built using React Native
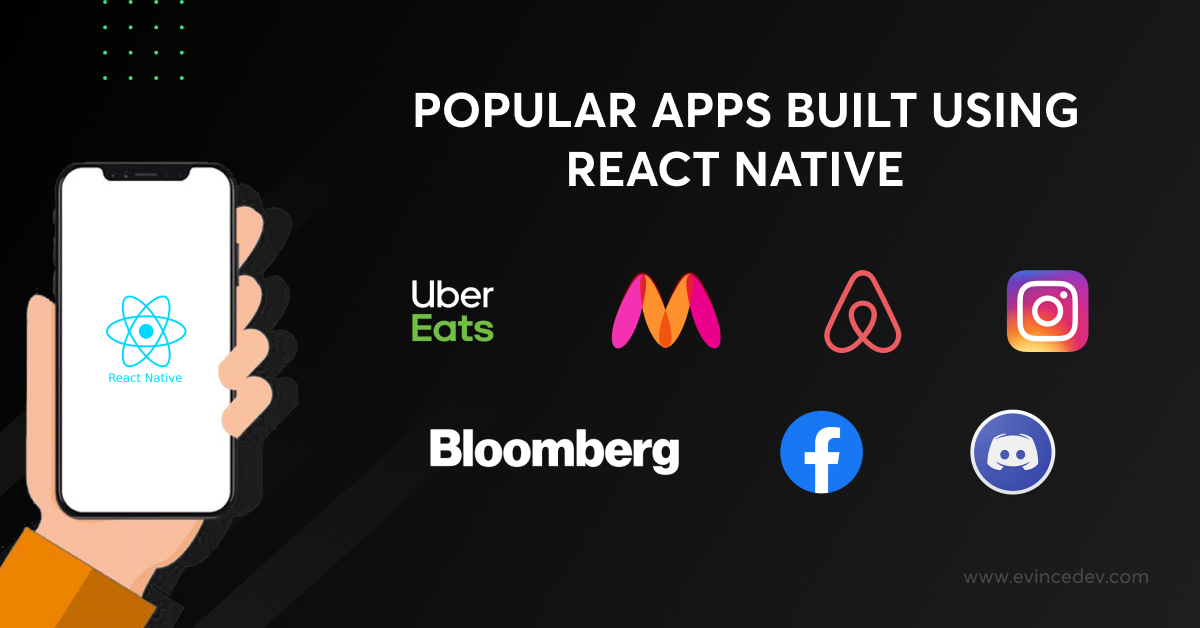
Multiple business giants use this modern-day technology, including Uber eats, Myntra, Airbnb, Instagram, Bloomberg, Facebook Messenger, Discord, etc. What makes this technology stand apart is the feature to share codes between two different operating systems to develop an application without compromising the performance and being cost-effective at the same time.
Major differences between React Native and other traditional technologies
React native is written using Javascript, and it is known as a hybrid framework. This quality of React Native separates it from conventional apps written in Native languages such as Java or Kotin for Android apps and swift or objective – C for apps on iOS. Using a hybrid app technology allows the developer to write code once that can run on both Android and iOS devices. While most hybrid frameworks such as Ionic, Cordova, Phonegap entirely rely upon web view to achieve cross-compatible capabilities, React Native works differently. Instead of using a web view, React operates through a system that allows it to render Native components from base Javascript code.
As React Native runs on both Android and iOS, it allows both target platforms to receive an outcome from a single team of developers and codebase, which results in quicker and easier development and testing of the app.
Why choose to React Native for App development?
1. Budget-friendly
React Native allow the coders to use the same code for iOS and Android. Until the time when this technology was under wraps to the world, the cost to develop an application for iOS and Android separately was relatively expensive, time-consuming, complex, and required extra efforts. But with the arrival of cross-compatible technology, building & maintenance got real quick, easy, and cost-effective. If you’re a startup with limited funds or even a well-settled businessman, you should still opt for cross-platform app development technology to optimize your investment.
2. Less laborious/flexible with Code reusability
One of the unique benefits of react native app development technology is code reusability. The coders don’t have to develop a separate app for iOS and Android. Prevailing codes available in the open-source library help developers to implement it as per requirements of the app, this contributes to the faster development work with high performance. The time consumption to deliver work is also lesser than compared to traditional technologies.
3. Robust functionality & Less memory usage for User Friendliness
React Native apps offer smooth functionality without interruptions with no delay in loading, hanging, or crash. On the aesthetic part, both iOS and Android apps built with React Native resemble each other and are quick responsive in nature. Accessibility provided to third-party plugins and APIs by React apps also facilitates less memory usage. This sums up to the user-friendliness of the application.
4. App Maintenance
Updating the apps regularly is part and parcel of the app’s lifecycle. As per estimation, almost 20% of the total development cost is incurred during the up-gradation of the app yearly. App updates, bug fixes, and changes in design as per trend are equally essential to manage engagements and sustain users effectively. Hence, one should estimate the cost while getting the app developed. To avoid hefty expenses on maintenance, one can tie up with a company or with a freelancer.
5. Scalability
Apps developed using React Native can be scaled using the various methods, Unit testing, component testing, Integration testing, and functional testing. Moreover, different frameworks to test React Native apps such as Jest, Detox, and Cypress. The test results define the quality and functionality of apps.
It is easy for cross-compatible apps to be listed on google and apple stores. The ready availability of the app for installation helps in maximizing outreach and expands users. Additionally, recycle codes used in React apps makes it highly scalable and further lowers the development cost.
6. Hot Reloading & Live Reloading
React Native allows both live reloading and hot reloading, which means that the changes made by the developer can be quickly viewed and tested. The Live Reloading feature helps in compiling and reading the file where the developers had made changes. Whereas, Hot Reloading allows the modification of the source code without the needing to recompile the application. The ability to do this without losing the present page or reloading manually helps in boosting productivity.
7. Community Driven
React native app development technology is community-driven; developers across the world often upload codes online that can be easily re-modified and used. Also, if developers are looking for answers the right way, the Reactiflux Discord community can clear all of their queries. There are several React Native experts, who can help out at any given time. Similarly, on the GitHub React Native community, developers can get plenty of suggestions.
8. Futuristic approach of React Native
The market of React Native is surging day by day and will continue to do so for decades. According to reports, the revenue of mobile apps developed using React Native technology are projected to reach $188.9 billion by the end of 2020. The technology is adopted by multiple business giants like Facebook, Airbnb, and Bloomberg and the future of React is only bright. React Native facilitates coders with the flexibility to avoid complex codes and try different languages. It is one of the most reliable options in the world of application development currently.
To Sum Up
The features of React Native is maturing and getting better day by day. If one has to develop a mobile application without a burning hole in the pocket and in less time, React Native is the best option available in the market. It provides a robust and high performing app that stands up against its competitors. React is becoming the first choice for the rapid development of mobile applications. From smaller companies to giants, businesses are moving ahead to adopt this simple and budget-friendly technology for the swift development of their mobile apps.
| Read here originally published blog: React Native App Development Services
0 likes · 0 comments
Maulik Pandya
1 year ago
How to Support New React Native Architecture in your Mobile App?
![»
J
Support New React RS og FH]
Native Architecture in
your Mobile App w @
LE](https://contents.bebee.com/users/id/BBny662bd7f5dada42/post/ykCFF62cc302bef31a/MXIu3.jpg)
This migration guide is intended for authors of React Native libraries and application developers. It explains how to deploy the new Architecture, including the new NativeModule system (TurboModule) and the new Renderer (Fabric), to iOS and Android libraries and apps.
Prerequisites for Applications
It must meet a few prerequisites before enabling the new architecture in the application.
Use a React Native nightly release
You must now use a React Native nightly release to get the most recent updates. We will eventually suggest aiming for a minimal stable open-source release.
This article is prepared, assuming you’re running a specific nightly release. The intended nightly release may be updated when new revisions of this guide are available. The nightly version that we’ll utilize for the rest of this guide is 0.0.0-20220201-2008-79975d146.
We recommend updating your app to the most recent open-source version before upgrading to a specific nightly release. By initially updating to a stated open-source release, you would be able to use tools such as the upgrade helper to evaluate what extra modifications may be needed for your project.
The most recent stable release is 0.68.2 as of this writing. After successfully upgrading your project to this version, you may target the 0.0.0-20220201-2008-79975d146 nightly release. You can target this nightly release in the same way you would any other React Native version:
yarn add react-native@0.0.0-20220201-2008-79975d146
Install react-native-codegen
Check that you are using the most recent version of the react-native-codegen NPM package. It is 0.0.13 at the time of this writing.
yarn add react-native-codegen
Android specifics
There are various prerequisites for using the new architecture on Android:
- Gradle 7.x and the Android Gradle Plugin 7.x is being used.
- Making use of the new React Gradle Plugin
- Creating React-native from the Source
You may upgrade Gradle by running:
cd android && ./gradlew wrapper –gradle-version 7.3 –distribution-type=all
While it must change the AGP version at the com.android.tools. Build:Gradle dependency line in the top-level build.gradle file.
If you’re ready, let’s install the new Gradle plugin, available as an NPM package named react-native-Gradle-plugin. You may accomplish so by using:
yarn add react-native-Gradle-plugin
You may check if the package is already installed by doing the following:
ls -la node_modules/react-native-Gradle-plugin
You may now change your top-level settings.Gradle file to add the following line at the bottom of the file:
includeBuild(‘../node_modules/react-native-gradle-plugin’)
include(“:ReactAndroid”)
project(“:ReactAndroid”).projectDir = file(‘../node_modules/react-native/ReactAndroid’)
Then, in the top-level Gradle file, add the following lines:
buildscript {
// …dependencies {// Make sure that AGP is at least at version 7.xclasspath(“com.android.tools.build:gradle:7.0.4”)// Add those linesclasspath(“com.facebook.react:react-native-gradle-plugin”)classpath(“de.undercouch:gradle-download-task:4.1.2”)}}
Include the following in your module-level Gradle file (typically app/build.gradle[.kts]):
apply plugin: “com.android.application”
// Add those lines
apply plugin: “com.facebook.react”// Add those lines as wellreact {
reactRoot = rootProject.file(“../node_modules/react-native/”)
codegenDir = rootProject.file(“../node_modules/react-native-codegen/”)}
Finally, change your project to utilize the react-native requirement from the source instead of a pre-compiled object from the NPM package. It is required since the subsequent setup will depend on creating native code using the source.
Let’s update the following line in your module-level build.Gradle (the one in the app/ folder):
dependencies {
// Replace this:implementation “com.facebook.react:react-native:+” // From node_modules// With this:implementation project(“:ReactAndroid”) // From node_modules
Use Hermes
Hermes is an open-source JavaScript engine designed specifically for React Native. We strongly advise you to use Hermes in the application. With Hermes configured, you would be able to debug your JavaScript code directly in Flipper using the JavaScript debugger.
iOS: Enable C++17 language feature support
To enable C++17 language features, you must change your Xcode project settings.
Instructions
- In the Project Navigator on the left, select your project (e.g., MyXcodeApp)
- Then, in the middle pane, check sure your project is chosen.
- Look for C++ Language Dialect or CLANG CXX LANGUAGE STANDARD in Build Settings.
- Select C++17 from the dropdown menu (or type “c++17” straight into the value field).
If you did everything successfully, your diff should display the following modifications to your project file: CLANG_CXX_LANGUAGE_STANDARD = “c++17”
Folly should also be enabled in your project, and it should occur instantly after the library requirement is detected. Thus no more modifications to your project are required.
iOS: Use Objective-C++ (.mm extension)
Objective-C or C++ can be used to create TurboModules. Any source files containing C++ code should be using the.mm file extension to handle both instances. This extension is equivalent to Objective-C++, a language variation that supports the usage of C++ and Objective-C in source files.
To guarantee that file references remain in your project, use Xcode to rename existing files. Before rebuilding the program, you may need to clear the build folder (Project Clean Build Folder). If the file is changed outside of Xcode, you may have to locate the new file by clicking on the old.m file references.
iOS: TurboModules: Make sure your App Offers an RCTCxxBridgeDelegate
To configure the TurboModule system, add more code to your AppDelegate that interacts with the bridge. Before you begin, rename your AppDelegate file for using the.mm extension.
Your AppDelegate will now comply with RCTCxxBridgeDelegate. Begin by including the following imports at the beginning of your AppDelegate file:
#import <reacthermes/HermesExecutorFactory.h>
#import <React/RCTCxxBridgeDelegate.h>
#import <React/RCTJSIExecutorRuntimeInstaller.h>
Then, as an RCTCxxBridgeDelegate provider, declare your app delegate:
@interface AppDelegate () <RCTCxxBridgeDelegate> { // … } @end
You must implement the jsExecutorFactoryForBridge: function to comply with the RCTCxxBridgeDelegate protocol. Typically, you should get a JSCExecutorFactory or HermesExecutorFactory here, and we will use it later to install our TurboModules bindings.
You may use the jsExecutorFactoryForBridge: method as follows:
#pragma mark – RCTCxxBridgeDelegate
– (std::unique_ptr<facebook::react::JSExecutorFactory>)jsExecutorFactoryForBridge:(RCTBridge *)bridge{return std::make_unique<facebook::react::HermesExecutorFactory>(facebook::react::RCTJSIExecutorRuntimeInstaller([bridge](facebook::jsi::Runtime &runtime) {if (!bridge) {return;}}));}
Enabling the New NativeModule System (TurboModule) in your App
Android
1. Enable NDK and the native build
The code-gen will generate some Java and C++ code, which we must now build.
Let’s go through your module-level build.gradle to add the following two externalNativeBuild blocks within the android block:
android { defaultConfig {applicationId “com.awesomeproject”// …
// Add this block
externalNativeBuild {ndkBuild {arguments “APP_PLATFORM=android-21″,”APP_STL=c++_shared”,”NDK_TOOLCHAIN_VERSION=clang”,”GENERATED_SRC_DIR=$buildDir/generated/source”,”PROJECT_BUILD_DIR=$buildDir”,”REACT_ANDROID_DIR=$rootDir/../node_modules/react-native/ReactAndroid”,”REACT_ANDROID_BUILD_DIR=$rootDir/../node_modules/react-native/ReactAndroid/build”cFlags “-Wall”, “-Werror”, “-fexceptions”, “-frtti”, “-DWITH_INSPECTOR=1″cppFlags “-std=c++17″targets “myapplication_appmodules” }}}
// Add this block
externalNativeBuild { ndkBuild { path “$projectDir/src/main/jni/Android.mk” } } }
Let’s add the following part to the same build.gradle file, under the same android:
android {
// …def reactAndroidProjectDir = project(‘:ReactAndroid’).projectDirdef packageReactNdkLibs = tasks.register(“packageReactNdkLibs”, Copy) {dependsOn(“:ReactAndroid:packageReactNdkLibsForBuck”)dependsOn(“generateCodegenArtifactsFromSchema”)from(“$reactAndroidProjectDir/src/main/jni/prebuilt/lib”)into(“$buildDir/react-ndk/exported”)}afterEvaluate {preBuild.dependsOn(packageReactNdkLibs)configureNdkBuildDebug.dependsOn(preBuild)configureNdkBuildRelease.dependsOn(preBuild) }packagingOptions {pickFirst ‘**/libhermes.so’pickFirst ‘**/libjsc.so’ } }
Finally, under the src/main/jni folder, create a Makefile named Android.mk with the following points:
THIS_DIR := $(call my-dir)
include $(REACT_ANDROID_DIR)/Android-prebuilt.mk
include $(GENERATED_SRC_DIR)/codegen/jni/Android.mkinclude $(CLEAR_VARS)LOCAL_PATH := $(THIS_DIR)
LOCAL_MODULE := myapplication_appmodulesLOCAL_C_INCLUDES := $(LOCAL_PATH) $(GENERATED_SRC_DIR)/codegen/jni
LOCAL_SRC_FILES := $(wildcard $(LOCAL_PATH)/*.cpp) $(wildcard $(GENERATED_SRC_DIR)/codegen/jni/*.cpp)
LOCAL_EXPORT_C_INCLUDES := $(LOCAL_PATH) $(GENERATED_SRC_DIR)/codegen/jni# Please note as one of the library listed is libreact_codegen_samplelibrary
# This name will be generated as libreact_codegen_<library-name>
# where <library-name> is the one you specified in the Gradle configuration
LOCAL_SHARED_LIBRARIES := libjsi \
libfbjni \
libglog \
libfolly_json \
libyoga \
libreact_nativemodule_core \
libturbomodulejsijni \
librrc_view \
libreact_render_core \
libreact_render_graphics \
libfabricjni \
libfolly_futures \
libreact_debug \
libreact_render_componentregistry \
libreact_render_debug \
libruntimeexecutor \
libreact_codegen_rncore \
libreact_codegen_samplelibraryLOCAL_CFLAGS := \
-DLOG_TAG=\”ReactNative\”
LOCAL_CFLAGS += -fexceptions -frtti -std=c++17 -Wallinclude $(BUILD_SHARED_LIBRARY)
This configuration will execute a native build on the project and compile the C++ files the codegen has generated. The native build will be running alongside the Gradle task: app:externalNativeBuildDebug
You can now test that everything is working properly by starting your Android app: yarn react-native run-android
2. Java – Provide a ReactPackageTurboModuleManagerDelegate
It’s finally time to put the TurboModule to work. First, we’ll need to make a ReactPackageTurboModuleManagerDelegate subclass similar to this:
package com.awesomeproject;
import com.facebook.jni.HybridData;import com.facebook.react.ReactPackage;import com.facebook.react.ReactPackageTurboModuleManagerDelegate;import com.facebook.react.bridge.ReactApplicationContext;import com.facebook.soloader.SoLoader;import java.util.List;public class MyApplicationTurboModuleManagerDelegate extends ReactPackageTurboModuleManagerDelegate {private static volatile boolean sIsSoLibraryLoaded;protected MyApplicationTurboModuleManagerDelegate(ReactApplicationContext reactApplicationContext, List<ReactPackage> packages) {super(reactApplicationContext, packages); }protected native HybridData initHybrid();public static class Builder extends ReactPackageTurboModuleManagerDelegate.Builder {protected MyApplicationTurboModuleManagerDelegate build(ReactApplicationContext context, List<ReactPackage> packages) {return new MyApplicationTurboModuleManagerDelegate(context, packages); } }@Override
protected synchronized void maybeLoadOtherSoLibraries() {// Prevents issues with initializer interruptions.
if (!sIsSoLibraryLoaded) { SoLoader.loadLibrary(“myapplication_appmodules”); sIsSoLibraryLoaded = true; } } }
Please keep in mind that the SoLoader.loadLibrary argument (in this example, “myapplication appmodules”) should match the one set for LOCAL MODULE:= inside the Android.mk file you previously built.
This class will subsequently be in charge of loading the TurboModules and the native library built with the NDK during runtime.
3. Adapt your ReactNativeHost to use the ReactPackageTurboModuleManagerDelegate
The class you developed may then be sent to your ReactNativeHost. You may find your ReactNativeHost by looking for the getReactNativeHost function (). The ReactNativeHost is often found within your Application class.
Once you’ve found it, add the getReactPackageTurboModuleManagerDelegateBuilder function as seen in the code below:
public class MyApplication extends Application implements ReactApplication {
private final ReactNativeHost mReactNativeHost =new ReactNativeHost(this) {@Overridepublic boolean getUseDeveloperSupport() { /* … */ }@Overrideprotected List<ReactPackage> getPackages() { /* … */ }@Overrideprotected String getJSMainModuleName() {/* … */ }@NonNull@Overrideprotected ReactPackageTurboModuleManagerDelegate.Builder getReactPackageTurboModuleManagerDelegateBuilder() {return new MyApplicationTurboModuleManagerDelegate.Builder(); } }; }
4. Extend the getPackages() from your ReactNativeHost to use the TurboModule
On the ReactNativeHost, we need to add the newly built TurboModule to the getPackages() function. Make the following changes to the method:
public class MyApplication extends Application implements ReactApplication {
private final ReactNativeHost mReactNativeHost =new ReactNativeHost(this) {@Overridepublic boolean getUseDeveloperSupport() { /* … */ }@Overrideprotected List<ReactPackage> getPackages() {List<ReactPackage> packages = new PackageList(this).getPackages();// Add those linespackages.add(new TurboReactPackage() {@Nullable@Overridepublic NativeModule getModule(String name, ReactApplicationContext reactContext) {if (name.equals(NativeAwesomeManager.NAME)) {return new NativeAwesomeManager(reactContext);} else {return null; } }@Overridepublic ReactModuleInfoProvider getReactModuleInfoProvider() { return () -> {final Map<String, ReactModuleInfo> moduleInfos = new HashMap<>();moduleInfos.put( NativeAwesomeManager.NAME,new ReactModuleInfo( NativeAwesomeManager.NAME,”NativeAwesomeManager”, false, // canOverrideExistingModulefalse, // needsEagerInittrue, // hasConstants
false, // isCxxModule
true // isTurboModule ) );
return moduleInfos; }; } }); return packages; }
@Override
protected String getJSMainModuleName() {/* … */ }
@NonNull
@Override
protected ReactPackageTurboModuleManagerDelegate.Builder getReactPackageTurboModuleManagerDelegateBuilder() { return new MyApplicationTurboModuleManagerDelegate.Builder(); } };
5. C++ Provide a native implementation for the methods in your *TurboModuleDelegate class
If you look closely at the previously created class MyApplicationTurboModuleManagerDelegate, you will find that some of the functions are native.
As a result, you’ll need to include certain C++ classes to implement those functions. You will require the following files, which must place in the src/main/jni folder:
- h The TurboModule Delegate’s header file.
- cpp The use of the header above file.
- h A TurboModule provider header file in which you may define which TurboModules to run.
- cpp The implementation of the previously specified header file.
- CPP The location of the initialization code. TurboModule, in particular, makes use of FBJNI. Therefore the initialization for such libraries is stored there.
The following information should be included in such files:
MyApplicationTurboModuleManagerDelegate.h
Please keep in mind that the kJavaDescriptor should be modified to match the package name you choose for your project.
#include <memory>
#include <string>
#include <ReactCommon/TurboModuleManagerDelegate.h>
#include <fbjni/fbjni.h>
namespace facebook { namespace react { class MyApplicationTurboModuleManagerDelegate : public jni::HybridClass<MyApplicationTurboModuleManagerDelegate, TurboModuleManagerDelegate> { public:
// Adapt it to the package you used for your Java class.
static constexpr auto kJavaDescriptor = “Lcom/awesomeproject/MyApplicationTurboModuleManagerDelegate;”;
static jni::local_ref<jhybriddata> initHybrid(jni::alias_ref<jhybridobject>);
static void registerNatives();
std::shared_ptr<TurboModule> getTurboModule(const std::string name, const std::shared_ptr<CallInvoker> jsInvoker) override;
std::shared_ptr<TurboModule> getTurboModule(const std::string name, const JavaTurboModule::InitParams ¶ms) override;
private:
friend HybridBase;
using HybridBase::HybridBase; }; } // namespace react } // namespace facebook
MyApplicationTurboModuleManagerDelegate.cpp
#include “MyApplicationTurboModuleManagerDelegate.h”
#include “MyApplicationModuleProvider.h”namespace facebook {namespace react {jni::local_ref<MyApplicationTurboModuleManagerDelegate::jhybriddata> MyApplicationTurboModuleManagerDelegate::initHybrid(jni::alias_ref<jhybridobject>) {return makeCxxInstance();}void MyApplicationTurboModuleManagerDelegate::registerNatives() {registerHybrid({makeNativeMethod(“initHybrid”, MyApplicationTurboModuleManagerDelegate::initHybrid), }); }std::shared_ptr<TurboModule> MyApplicationTurboModuleManagerDelegate::getTurboModule(const std::string name, const std::shared_ptr<CallInvoker> jsInvoker) {// Not implemented yet: provide pure-C++ NativeModules here.return nullptr; }std::shared_ptr<TurboModule> MyApplicationTurboModuleManagerDelegate::getTurboModule(const std::string name, const JavaTurboModule::InitParams ¶ms) {return MyApplicationModuleProvider(name, params); } } // namespace react } // namespace facebook
MyApplicationModuleProvider.h
#pragma once
#include <memory>#include <string>#include <ReactCommon/JavaTurboModule.h>namespace facebook {namespace react {std::shared_ptr<TurboModule> MyApplicationModuleProvider(const std::string moduleName, const JavaTurboModule::InitParams ¶ms);} // namespace react} // namespace facebook
MyApplicationModuleProvider.cpp
Please modify the samplelibrary.h import to use the same library name that you used while building the applications. It is the C++-created file produced by codegen.
If you have more than one TurboModule, you can select more than one supplier here. In this case, we specifically seek a TurboModule from the sample library (the one we provided) and drop it back to the rncore Module Provider.
#include “MyApplicationModuleProvider.h”
#include <rncore.h>#include <samplelibrary.h>namespace facebook {namespace react {std::shared_ptr<TurboModule> MyApplicationModuleProvider(const std::string moduleName, const JavaTurboModule::InitParams ¶ms) {auto module = samplelibrary_ModuleProvider(moduleName, params);if (module != nullptr) {return module; }return rncore_ModuleProvider(moduleName, params); }} // namespace react} // namespace facebook
OnLoad.cpp
#include <fbjni/fbjni.h>
#include “MyApplicationTurboModuleManagerDelegate.h”JNIEXPORT jint JNICALL JNI_OnLoad(JavaVM *vm, void *) {return facebook::jni::initialize(vm, [] {facebook::react::MyApplicationTurboModuleManagerDelegate::registerNatives();});}
6. Enable the useTurboModules flag in your Application onCreate
Finally, you may enable TurboModule functionality in the application. To do so, enable the useTurboModule flag in the Application onCreate function.
public class MyApplication extends Application implements ReactApplication {
@Overridepublic void onCreate() {ReactFeatureFlags.useTurboModules = true;//…}
It’s now time to re-run your Android app to ensure that everything is working correctly: yarn react-native run-android
iOS
1. Provide a TurboModuleManager Delegate
Include the following imports at the start of the bridge delegate (for example, AppDelegate.mm):
You must also specify that the AppDelegate follows the RCTTurboModuleManagerDelegate protocol and add an instance variable for the Turbo Module manager:
@interface AppDelegate () <RCTCxxBridgeDelegate, RCTTurboModuleManagerDelegate> {
// … RCTTurboModuleManager *_turboModuleManager; } @end
To comply with the RCTTurboModuleManagerDelegate standard, you must implement the following three methods:
- getModuleClassFromName: – The Class for a native module should be returned by this function. To handle the default core modules, use the RCTCoreModulesClassProvider() function.
- getTurboModule:jsInvoker: – This should return nullptr. This approach might be used in the future to support C++ TurboModules.
- getModuleInstanceFromClass:moduleClass: – When your TurboModules are initialized, you may use this method to conduct any side effects. It is the TurboModule equivalent of the extraModulesForBridge function on your bridge delegate. You must now initialize the default RCTNetworking and RCTImageLoader modules as shown below.
TurboModuleManagerDelegate Example
Take notice of getModuleInstanceFromClass: in the following cases since it contains the required instantiation of numerous essential modules that you’ll need to include within your application. It may not be necessary for the long run.
AppDelegate.mm
// …#import <React/RCTDataRequestHandler.h>#import <React/RCTHTTPRequestHandler.h>#import <React/RCTFileRequestHandler.h>#import <React/RCTNetworking.h>#import <React/RCTImageLoader.h>#import <React/RCTGIFImageDecoder.h>#import <React/RCTLocalAssetImageLoader.h>#import <React/CoreModulesPlugins.h>#import <ReactCommon/RCTTurboModuleManager.h>// …#pragma mark RCTTurboModuleManagerDelegate- (Class)getModuleClassFromName:(const char *)name {return RCTCoreModulesClassProvider(name); }- (std::shared_ptr<facebook::react::TurboModule>)getTurboModule:(const std::string &)namejsInvoker:(std::shared_ptr<facebook::react::CallInvoker>)jsInvoker { return nullptr; }- (id<RCTTurboModule>)getModuleInstanceFromClass:(Class)moduleClass {// Set up the default RCTImageLoader and RCTNetworking modules.if (moduleClass == RCTImageLoader.class) { return [[moduleClass alloc] initWithRedirectDelegate:nilloadersProvider:^NSArray<id<RCTImageURLLoader>> *(RCTModuleRegistry * moduleRegistry) {return @ [[RCTLocalAssetImageLoader new]]; } decodersProvider:^NSArray<id<RCTImageDataDecoder>> *(RCTModuleRegistry * moduleRegistry) { return @ [[RCTGIFImageDecoder new]]; }];} else if (moduleClass == RCTNetworking.class) { return [[moduleClass alloc]
initWithHandlersProvider:^NSArray<id<RCTURLRequestHandler>> *( RCTModuleRegistry *moduleRegistry) {
return @[ [RCTHTTPRequestHandler new], [RCTDataRequestHandler new], [RCTFileRequestHandler new], ]; }]; }
// No custom initializer here.
return [moduleClass new]; }
2. Install TurboModuleManager JavaScript Bindings
Next, in the bridge delegate’s jsExecutorFactoryForBridge: function, build an RCTTurboModuleManager and install the JavaScript bindings:
pragma mark – RCTCxxBridgeDelegate
– (std::unique_ptr<facebook::react::JSExecutorFactory>)jsExecutorFactoryForBridge:(RCTBridge *)bridge{// Add these lines to create a TurboModuleManagerif (RCTTurboModuleEnabled()) {_turboModuleManager =[[RCTTurboModuleManager alloc] initWithBridge:bridgedelegate:selfjsInvoker:bridge.jsCallInvoker];// Necessary to allow NativeModules to lookup TurboModules[bridge setRCTTurboModuleRegistry:_turboModuleManager];if (!RCTTurboModuleEagerInitEnabled()) {/*** Instantiating DevMenu has the side effect of registering* shortcuts for CMD + d, CMD + i, and CMD + n via RCTDevMenu.* Therefore, when TurboModules are enabled, we must manually create this* NativeModule. */[_turboModuleManager moduleForName:”DevMenu”]; } }// Add this line…__weak __typeof(self) weakSelf = self;// If you want to use the `JSCExecutorFactory,` remember to add the `#import<React/JSCExecutorFactory.h>`// import statement on top.
return std::make_unique<facebook::react::HermesExecutorFactory>(
facebook::react::RCTJSIExecutorRuntimeInstaller([weakSelf, bridge](facebook::jsi::Runtime &runtime) {
if (!bridge) { return; }
// And add these lines to install the bindings…
__typeof(self) strongSelf = weakSelf;
if (strongSelf) { facebook::react::RuntimeExecutor syncRuntimeExecutor = [&](std::function<void(facebook::jsi::Runtime & runtime_)> &&callback) { callback(runtime); };
[strongSelf->_turboModuleManager installJSBindingWithRuntimeExecutor:syncRuntimeExecutor]; } })); }
3. Enable TurboModule System
Finally, activate TurboModules in the app by running the following sentence in your app delegate before React Native is started (e.g., within didFinishLaunchingWithOptions:):
RCTEnableTurboModule(YES);
Example
@implementation AppDelegate
– (BOOL)application:(UIApplication *)application didFinishLaunchingWithOptions:(NSDictionary *)launchOptions
{ RCTEnableTurboModule(YES);
RCTBridge *bridge = [[RCTBridge alloc] initWithDelegate:self
launchOptions:launchOptions];
// …
return YES; }
Enabling the New Renderer (Fabric) in your App
Android
1. Provide a JSIModulePackage inside your ReactNativeHost
To enable Fabric in your project, you must include a JSIModulePackage within your ReactNativeHost. If you followed the TurboModule part of this guide, you may find your ReactNativeHost by looking for the getReactNativeHost function (). The ReactNativeHost is often found within your Application class.
Once you’ve found it, add the getJSIModulePackage function as seen in the code below:
MyApplication.java
public class MyApplication extends Application implements ReactApplication {private final ReactNativeHost mReactNativeHost =new ReactNativeHost(this) {// Add those lines:@Nullable@Overrideprotected JSIModulePackage getJSIModulePackage() {return new JSIModulePackage() {@Overridepublic List<JSIModuleSpec> getJSIModules(final ReactApplicationContext reactApplicationContext,final JavaScriptContextHolder jsContext) {final List<JSIModuleSpec> specs = new ArrayList<>();specs.add(new JSIModuleSpec() {@Overridepublic JSIModuleType getJSIModuleType() {return JSIModuleType.UIManager; }@Overridepublic JSIModuleProvider<UIManager> getJSIModuleProvider() { final ComponentFactory componentFactory = new ComponentFactory();CoreComponentsRegistry.register(componentFactory);final ReactInstanceManager reactInstanceManager = getReactInstanceManager();ViewManagerRegistry viewManagerRegistry = new ViewManagerRegistry(
reactInstanceManager.getOrCreateViewManagers(
reactApplicationContext));
return new FabricJSIModuleProvider( reactApplicationContext, componentFactory, new EmptyReactNativeConfig(), viewManagerRegistry); } }); return specs; } }; } }; }
2. Make sure your call setIsFabric on your Activity’s ReactRootView
Make sure you use setIsFabric on the ReactRootView within your Activity class. You may need to build a ReactActivityDelegate.
public class MainActivity extends ReactActivity {
// Add the Activity Delegate if you don’t have one already.public static class MainActivityDelegate extends ReactActivityDelegate {public MainActivityDelegate(ReactActivity activity, String mainComponentName) {super(activity, mainComponentName);}@Overrideprotected ReactRootView createRootView() {ReactRootView reactRootView = new ReactRootView(getContext());// Make sure to call setIsFabric(true) on your ReactRootViewreactRootView.setIsFabric(true);return reactRootView; } }// Make sure to override the `createReactActivityDelegate()` method.@Overrideprotected ReactActivityDelegate createReactActivityDelegate() { return new MainActivityDelegate(this, getMainComponentName()); } }
The reactRootView.setIsFabric(true) call is critical in this code because it enables the new renderer for such an Activity.
You can now test that everything is working correctly by starting your Android app: yarn react-native run-android
To prove that Fabric is functioning correctly, you should now see the following log in your Metro terminal log:
BUNDLE ./App.js
LOG Running “App” with {“fabric”:true,”initialProps”:{},”rootTag”:1}
Migrating Android ViewManagers
To begin, ensure that you follow the Enabling the New Renderer (Fabric) guidelines in the Android Application. Furthermore, we will presume that you followed the rules in Enabling the New NativeModule System (TurboModule) in the Android Application because the Makefile (Android.mk) or other native build setup stages are covered there and will not be covered here.
JavaScript changes
- Follow these steps to ensure that your other JS updates are ready. Get your JavaScript code for the new React Native Renderer (Fabric).
- Change the requireNativeComponent call to codegenNativeComponent. It instructs the JS codegen to begin producing the component’s native implementation, consisting of C++ and Java classes. It’s how the WebView component appears:
import codegenNativeComponent from
‘react-native/Libraries/Utilities/codegenNativeComponent’;
// babel-plugin-codegen will replace the function call to use NativeComponentRegistry
// ‘RCTWebView’ is interopped by RCTFabricComponentsPlugins
export default (codegenNativeComponent<NativeProps>(
‘RCTWebView’,
): HostComponent<NativeProps>);
- [Flow users] Ensure your native component’s properties have Flow types since the JS codegen utilizes these types to produce the type-safe native execution of the component. The codegen creates C++ classes during the build process, ensuring that the native execution is always up to date with its JS interface. Make use of these C++-compatible kinds.
RNTMyNativeViewNativeComponent.js
import type {Int32} from ‘react-native/Libraries/Types/CodegenTypes’;
import codegenNativeComponent from ‘react-native/Libraries/Utilities/codegenNativeComponent’;
import type {HostComponent} from ‘react-native’;
import type {ViewProps} from ‘react-native/Libraries/Components/View/ViewPropTypes’;
type NativeProps = $ReadOnly<{|
…ViewProps, // This is required.
someNumber: Int32,
|}>;
[…]
export default (codegenNativeComponent<NativeProps>(
‘RNTMyNativeView’, ): HostComponent<NativeProps>);
- [TypeScript users] We are presently considering TypeScript support.
Native/Java Changes
1. Update (or create) the ViewManager to use the Codegen-generated classes.
You must specifically design the created ViewManagerInterface and provide events to the generated ViewManagerDelegate. Your ViewManager might follow this structure. In this case, the MyNativeView class is an Android View equivalent (like a subclass of LinearLayout, Button, TextView, etc.)
MyNativeViewManager.java
// View manager for MyNativeView components.@ReactModule(name = MyNativeViewManager.REACT_CLASS)public class MyNativeViewManager extends SimpleViewManager<MyNativeView>implements RNTMyNativeViewManagerInterface<MyNativeView> {public static final String REACT_CLASS = “RNTMyNativeView”;private final ViewManagerDelegate<MyNativeView> mDelegate;public MyNativeViewManager() {mDelegate = new RNTMyNativeViewManagerDelegate<>(this); }@Nullable@Overrideprotected ViewManagerDelegate<MyNativeView> getDelegate() {return mDelegate; }@NonNull@Overridepublic String getName() {return REACT_CLASS; }@NonNull@Overrideprotected MyNativeView createViewInstance(@NonNull ThemedReactContext reactContext) {return new MyNativeView(reactContext); } }
2. Add your ViewManager to one of your application’s Packages.
Modify the getPackages function in the ReactNativeHost to add the following:
public class MyApplication extends Application implements ReactApplication {
private final ReactNativeHost mReactNativeHost = new ReactNativeHost(this) {
@Override
public boolean getUseDeveloperSupport() { /* … */ }
@Override
protected List<ReactPackage> getPackages() {
List<ReactPackage> packages = new PackageList(this).getPackages();
// … other packages or `TurboReactPackage added` here…
// Add those lines.
packages.add(new ReactPackage() {
@NonNull
@Override
public List<NativeModule> createNativeModules(
@NonNull ReactApplicationContext reactContext) {
return Collections.emptyList(); }
@NonNull
@Override
public List<ViewManager> createViewManagers(
@NonNull ReactApplicationContext reactContext) {
// Your ViewManager is returned here.
return Collections.singletonList(new MyNativeViewManager()); } });
return packages; } }; }
3. Add a Fabric Component Registry
You must build a new component Registry to register your components for Fabric discovery. Let’s fill the MyComponentsRegistry file with the following information.
As you’ll see, some methods are native(), which we will write in C++ in the following section.
package com.awesomeproject;
import com.facebook.jni.HybridData;
import com.facebook.proguard.annotations.DoNotStrip;
import com.facebook.react.fabric.ComponentFactory;
import com.facebook.soloader.SoLoader;
@DoNotStrip
public class MyComponentsRegistry {
static { SoLoader.loadLibrary(“fabricjni”); }
@DoNotStrip private final HybridData mHybridData;
@DoNotStrip
private native HybridData initHybrid(ComponentFactory componentFactory);
@DoNotStrip
private MyComponentsRegistry(ComponentFactory componentFactory) {
mHybridData = initHybrid(componentFactory); }
@DoNotStrip
public static MyComponentsRegistry register(ComponentFactory componentFactory) {
return new MyComponentsRegistry(componentFactory); } }
4. Register your custom Fabric Component Registry
Finally, let’s modify the getJSIModulePackage function from the ReactNativeHost to enroll your Component Registry with the Core one:
public class MyApplication extends Application implements ReactApplication {
private final ReactNativeHost mReactNativeHost = new ReactNativeHost(this) {
@Nullable
@Override
protected JSIModulePackage getJSIModulePackage() {
return new JSIModulePackage() {
@Override
public List<JSIModuleSpec> getJSIModules(
final ReactApplicationContext reactApplicationContext,
final JavaScriptContextHolder jsContext) {
final List<JSIModuleSpec> specs = new ArrayList<>();
specs.add(new JSIModuleSpec() {
// …
@Override
public JSIModuleProvider<UIManager> getJSIModuleProvider() {
final ComponentFactory componentFactory = new ComponentFactory();
CoreComponentsRegistry.register(componentFactory);
// Add this line just below CoreComponentsRegistry.register
MyComponentsRegistry.register(componentFactory);
// … } });
return specs; } }; } }; }
Native/C++ Changes
It is now time to write a C++ code for your MyComponentsRegistry:
1. Create a header file: MyComponentsRegistry.h
The file must be placed in the src/main/jni directory. Please keep in mind that the kJavaDescriptor must be modified to match the package name you choose for your project.
MyComponentsRegistry.h
#pragma once
#include <ComponentFactory.h>
#include <fbjni/fbjni.h>
#include <react/renderer/componentregistry/ComponentDescriptorProviderRegistry.h>
#include <react/renderer/componentregistry/ComponentDescriptorRegistry.h>
namespace facebook {
namespace react {
class MyComponentsRegistry
: public facebook::jni::HybridClass<MyComponentsRegistry> {
public:
constexpr static auto kJavaDescriptor =
“Lcom/awesomeproject/MyComponentsRegistry;”;
static void registerNatives();
MyComponentsRegistry(ComponentFactory *delegate);
private:
friend HybridBase;
static std::shared_ptr<ComponentDescriptorProviderRegistry const>
sharedProviderRegistry();
const ComponentFactory *delegate_;
static jni::local_ref<jhybriddata> initHybrid(
jni::alias_ref<jclass>,
ComponentFactory *delegate); };
} // namespace react
} // namespace facebook
2. Create an implementation file: MyComponentsRegistry.cpp
The file should be beside ‘MyComponentsRegistry.h’ in the src/main/jni folder.
MyComponentsRegistry.cpp
#include “MyComponentsRegistry.h”#include <CoreComponentsRegistry.h>#include <fbjni/fbjni.h>#include <react/renderer/componentregistry/ComponentDescriptorProviderRegistry.h>#include <react/renderer/components/rncore/ComponentDescriptors.h>#include <react/renderer/components/samplelibrary/ComponentDescriptors.h>namespace facebook {namespace react {MyComponentsRegistry::MyComponentsRegistry(ComponentFactory *delegate): delegate_(delegate) {}std::shared_ptr<ComponentDescriptorProviderRegistry const>MyComponentsRegistry::sharedProviderRegistry() {auto providerRegistry = CoreComponentsRegistry::sharedProviderRegistry();providerRegistry->add(concreteComponentDescriptorProvider<RNTMyNativeViewComponentDescriptor>());return providerRegistry; }jni::local_ref<MyComponentsRegistry::jhybriddata>MyComponentsRegistry::initHybrid(jni::alias_ref<jclass>,ComponentFactory *delegate) {auto instance = makeCxxInstance(delegate);auto buildRegistryFunction =
[](EventDispatcher::Weak const &eventDispatcher,
ContextContainer::Shared const &contextContainer)
-> ComponentDescriptorRegistry::Shared { auto registry = MyComponentsRegistry::sharedProviderRegistry()
->createComponentDescriptorRegistry( {eventDispatcher, contextContainer});
auto mutableRegistry = std::const_pointer_cast<ComponentDescriptorRegistry>(registry);
mutableRegistry->setFallbackComponentDescriptor(
std::make_shared<UnimplementedNativeViewComponentDescriptor>(
ComponentDescriptorParameters{
eventDispatcher, contextContainer, nullptr}));
return registry; };
delegate->buildRegistryFunction = buildRegistryFunction; return instance; }
void MyComponentsRegistry::registerNatives() { registerHybrid({
makeNativeMethod(“initHybrid”, MyComponentsRegistry::initHybrid), }); } } // namespace react } // namespace facebook
3. Load your file in the OnLoad.cpp
You must have an OnLoad.cpp file in the src/main/jni folder if you followed the TurboModule guidelines. Add the following code to load the MyComponentsRegistry class:
OnLoad.cpp
#include <fbjni/fbjni.h>
#include “MyApplicationTurboModuleManagerDelegate.h”// Add this import#include “MyComponentsRegistry.h”JNIEXPORT jint JNICALL JNI_OnLoad(JavaVM *vm, void *) {return facebook::jni::initialize(vm, [] {facebook::react::MyApplicationTurboModuleManagerDelegate::registerNatives();// Add this linefacebook::react::MyComponentsRegistry::registerNatives(); }); }
You can now test that everything is working correctly by starting your Android app: yarn react-native run-android
iOS
1. Enable Fabric in Podfile
Changes should be made to your Podfile. Some examples may be found in RNTester & rn-demo-app.
Podfile
# Add the following line at the top of Podfile.
# Codegen produces files/classes that share names, and it will show the warning.
# deterministic_uuids option surpresses the warning.
install! ‘cocoapods’, :deterministic_uuids => false
target ‘Some App’ dopods()enddef pods()# Get configconfig = use_native_modules!# Use env variables to turn it on/off.fabric_enabled = ENV[‘USE_FABRIC’]use_react_native!(…# Modify here if your app root path isn’t the same as this one.:app_path => “#{Dir.pwd}/..”,# Pass the flag to enable fabric to use_react_native!.:fabric_enabled => fabric_enabled ) End
2. Update your root view
Your configuration determines the method you use to render your app using Fabric. Here’s an example of activating Fabric in your project using the RN FABRIC ENABLED compiler flag. As an example, consider Tester’s RN-AppDelegate.
AppDelegate.mm
#ifdef RN_FABRIC_ENABLED
#import <React/RCTFabricSurfaceHostingProxyRootView.h>
#import <React/RCTSurfacePresenter.h>
#import <React/RCTSurfacePresenterBridgeAdapter.h>
#import <react/config/ReactNativeConfig.h>
@interface AppDelegate () <RCTCxxBridgeDelegate,
RCTTurboModuleManagerDelegate> {
#ifdef RN_FABRIC_ENABLED
RCTSurfacePresenterBridgeAdapter *_bridgeAdapter;
std::shared_ptr<const facebook::react::ReactNativeConfig> _reactNativeConfig;
facebook::react::ContextContainer::Shared _contextContainer; #endif
// Find a line that defines rootView and replace/edit with the following lines.
#ifdef RN_FABRIC_ENABLED
_contextContainer = std::make_shared<facebook::react::ContextContainer const>();
_reactNativeConfig = std::make_shared<facebook::react::EmptyReactNativeConfig const>();
_contextContainer->insert(“ReactNativeConfig”, _reactNativeConfig);
_bridgeAdapter = [[RCTSurfacePresenterBridgeAdapter alloc]
initWithBridge:bridge
contextContainer:_contextContainer];
bridge.surfacePresenter = _bridgeAdapter.surfacePresenter;
UIView *rootView = [[RCTFabricSurfaceHostingProxyRootView alloc] initWithBridge:bridge
moduleName:<#moduleName#>
initialProperties:@{}];
// Current implementation to define rootview.
RCTRootView *rootView = [[RCTRootView alloc] initWithBridge:bridge
moduleName:<#moduleName#>
initialProperties:@{}]; #endif
3. Add Babel Plugins
It will start the codegen, which will run during the metro building process.
babel.config.js
module.exports = {presets: [‘module:metro-react-native-babel-preset’],plugins: [‘@babel/plugin-proposal-class-properties’,’./node_modules/react-native/packages/babel-plugin-codegen’]};
4. Run pod install
// Run pod install with the flags
USE_FABRIC=1 RCT_NEW_ARCH_ENABLED=1 pod install
Conclusion
Most JavaScript application code does not need to change due to the new architecture in terms of backward compatibility. The Java/ObjC code for custom View Managers and Native Modules must be changed, although many may be code-modified to work with the new system. A compatibility layer that allows bespoke View Managers and Native Modules to continue operating in the new system may also be built.
In terms of timeframes, most of the JSI code has already been deposited in the repository while writing. A considerable percentage of the Fabric code is already in the repository, and TurboModules upgrades are still being released. It is generally backward compatible; there is no need for a single release date but rather a steady rollout.
If you need any help regarding implementing it; contact us for migration.
| Read here in-depth blog:
How to Support New React Native Architecture in your Mobile App?
0 likes · 0 comments
Maulik Pandya
1 year ago
How To Increase eCommerce Product Sales Via Google Shopping Free Product Listing?

The Google Shopping platform enables people to browse millions of products across businesses of all sizes in seconds to get the item they’re searching for.
Google Shopping is set to alter how people purchase things, with a motto that aims to assist users in “choosing the ideal products, deals, and places to buy.”
Rather than instantly going to Amazon to look for a product, customers may use Google to find the lowest pricing online or in local shops.
In 2022, it will be essential to understand Google Shopping, especially if you’re a retailer. Keep reading to learn more about how free product listings run, why they’re essential, and how you can get involved.
How Does A Free Product Listing Work?
Even if a merchant isn’t running a Google Ads campaign, Google Shopping allows them to display their products for free in an Amazon-dominated market.
Merchants may use free product listings to promote their products across Google, not only on the Shopping page.
An eCommerce product can appear in Google Search, Images, or Lens product results. In the same way, businesses aren’t paid the price to be included in the Google Search index; Google similarly offers a free service for displaying products online.
Retailers can select between two types of free listings: standard and enhanced.
Digital transformations in the retail industry: Check for Retail IT Solution
Standard Listings
![- blazer for men Xx & Q
oogle
QAI QO Shopping ([@) Images @) News ff] Books i More Tools
About 1,620,000.000 resuits (0.53 seconds)
https: //www.macys.com > shop » mens-clothing » mens. i
Mens Blazers & Sports Coats - Macy's
eed’
NF WN
€ Wy
at Macy's. Free shipping available
Clearance/Closeout (44) - Sim Fit (84) - Blue (89) - Lauren Ralph Lauren Men's 1]](https://contents.bebee.com/users/id/BBny662bd7f5dada42/post/iKAEE62c7f3bfcac07/HHUmP.jpeg)
Standard product listings feature product descriptions that are appended to a search result.
This listing option requires minimal product information and is available across Google; however, traditional listings do not appear in the Shopping Tab.
From the Google Search results page, this standard listing provides a thorough product description, ratings, reviews, pricing, and availability.
Enhanced Listings
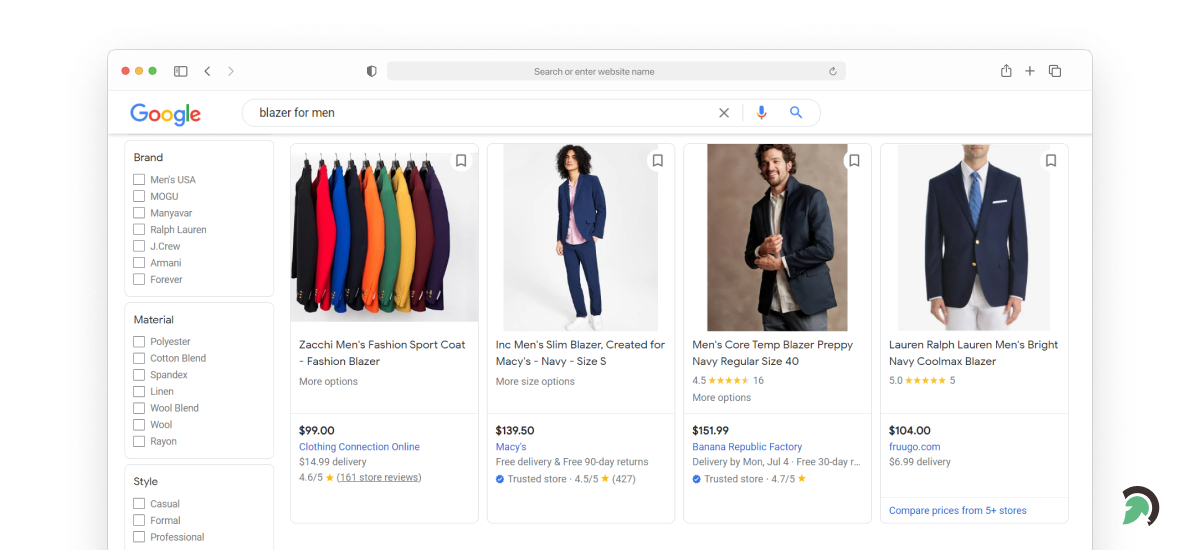
Enhanced listings need more than a typical listing’s basic product information to include more specific information about products.
This listing option mandates additional information from the store for the listing to be more eye-catching and engaging for the Google Shopping tab.
It includes a visually appealing image, ratings, extra style alternatives, pricing, a link to directions to the nearest store, stock, and a store comparison option.
Where Do Free Listings Appear?
Customers may view products from your store throughout Google with free listings. Your products may display in various Google locations if they qualify for free product listings.
The Shopping tab (shopping.google.com)

Customers looking for products like yours can see your free listings on the Shopping page, which provides visual experiences. Customers are sent to your website to finish the purchasing process.
- In all nations where the Shopping tab is online as a free products listing, it is accessible on desktop and mobile.
- If you’ve opted in, your in-store items may display in free local listings on the Shopping page. Customers may use these free local listings to determine if the product they’re looking for is available in the local retail shop. Store hours, routes, phone numbers, product pricing, availability, and estimated distance from the customer might all be included in your free local listing. In most nations where the Shopping tab is active, it is available.
- If you’ve opted in, your Buy on Google items may also display on the Shopping tab. It is a product that is accessible in the United States.
Google Search (google.com)
1. Rich Results

When users use Google Search to look up information about products, merchants, and brands, rich results might appear alongside the search result. It displays a few lines containing product information (pricing, availability, and product reviews) to give consumers additional helpful information.
- It is available worldwide on desktop and mobile.
2. Popular Products (Apparel and Accessories)
When consumers search for clothing and accessories on Google, they frequently want to see more noticeable results. Your most popular Apparel & Accessories items may be eligible to appear in more visual listings, including a product list carousel that corresponds to the category and is relevant to the user’s search. Customers may look at the items offered by various brands and stores, with links to retailer and brand websites where they can learn more.
- It is only accessible on mobile in the United States.
3. Shopping Knowledge Panel
The Shopping Knowledge Panel is a search field that collects product-related information, product data offers from stores selling the product, and product reviews are included. Your product may even be qualified to feature in this experience if your product data feed matches the searched product.
- It is available on mobile and desktop in the US, India, Chile, Australia, Brazil, Japan, Colombia, Argentina, Mexico, Canada, and South Africa.
4. Google Images (images.google.com)

Customers searching for items and businesses on Google Images may come across images labeled “Product.” It indicates that the product seen in the image is available for purchase. After engaging with it, customers will view full product snippets (including price, accessibility, reviews, and brand) beneath the image.
- It is available worldwide on mobile and desktop.
- Customers may use the Google Lens feature to see a list of related products by tapping on the lens symbol inside an image. These product results may include a “Product” label to indicate that the item is available for purchase and rich product snippets (i.e., availability). This function is available globally on desktop and mobile.
5. YouTube (youtube.com)
Customers can see a list of things that may be purchased right beneath a video on YouTube while watching it. Customers may also see similar items in their YouTube search results if they look for a particular retail product on YouTube. Your products may be qualified to appear in these formats if your product data contains the product being browsed or searched.
- Available within several countries as a free product listing with good trust signals on mobile.
Benefits of Free Product Listing
Google is used by millions and millions of people every day to shop. You can do the following with a Google product listing to boost eCommerce product sales:
- Increase your visibility to consumers who are already seeking products like yours.
- Promote your items by emphasizing your brand’s distinctive features.
- Increase the number of people who shop at local retailers.
- Increased revenues do not just result from the increased site and local shop traffic but also from people purchasing through Google.
- The best part is that you can stay competitive at no additional expense. Free product listings will compliment your existing efforts if you currently use Shopping Ads to promote your items.
Google uses analytics and algorithms to match your goods with the most relevant search queries, placing your offerings in front of interested customers.
Brands may track the performance of free listings using the Merchant Center and statistics.
This information provides merchants with information on individual items, which may use to drive future inventory and marketing strategy decisions.
How Can I Improve My Google-free listing?
Google Shopping product listing ads offer the most outstanding options to reach a larger audience and improve targeting. Here are some helpful Google merchant center feed recommendations to help you build a robust data set and get the most out of your campaigns.
1. Get a Global Trade Identification Number (GTIN)
A GTIN, or Universal Product Code, is the most crucial feed feature to consider (UPC). A GTIN is required for Google shopping feed optimization if a product requires one. Google’s matching system will search for the GTIN, and items that incorporate it will be recognized. While Google may still accept products without the needed GTIN, they will have a lower priority than those with it.
GTINs can be obtained from the product supplier by companies who want to integrate them into their products. This feature can be the difference between running overlooked and boosting conversions considerably.
2. Use the title character limit to its full potential.
Whereas the GTIN is the most crucial attribute for matching, the title used to hold that position — and still does. Feed headlines are limited to 150 characters for advertisers. Even though only 70 of those characters will appear on the Google Search Results Page (SERP), strive to use all of them for the best results. Begin by putting the most crucial and relevant information in the title, such as brands, descriptions, and other facts.
Run a search query analysis to determine which searches and keywords match the associated product. Please include them in the title as soon as all relevant phrases fit under the 150-character limit. It’s also crucial to consider which keywords are best for a product. When marketing a chaise lounge or a sofa, the term “couch” in the title, for example, might devalue the product in the eyes of the customer.
3. Keep age, sex, size, and color consistent.
Colour, sex, and size are required characteristics for items in the “Apparel & Accessories” category. For improved SEO, it’s also advisable to incorporate these characteristics in the title. In their names and descriptions, feeds should maintain consistency between these characteristics. These are vital elements to consider while optimizing product names and categories.
4. Make use of the complete list of attributes supported by the feed.
Use the whole list of properties that the feed offers. “pattern,” “material,” “size type,” and “is bundle” are some of these properties. If there is any more product information that should include in the feed, it might not fit under these qualities. In certain circumstances, having them with the “product detail” property is possible. In the long term, including as many details as necessary about a product will increase relevance and matching.
5. Use custom labels
To increase eCommerce sales, you can use Custom Labels 0-4 for any values in a product feed. Custom labels are a fantastic method to separate products in a Product Listing Ad (PLA) campaign structure. Please be creative with personalized labels, giving Google even more product details.
6. Getting tax, shipping & returns settings right
After you’ve done with the feeds, there’s one more step you need to take to have your Shopping ads displayed in other countries. You must specify your tax, shipping, and return options. While the tax part is only necessary if you are selling in the United States, the shipping options are essential for all countries.
To make this work, you must provide the exact data for each nation you sell. So, if you’re an Australian business that sells to the US, you must mention how long it will take to send your things to the US and how much it would cost.
If you’re billing in a currency other than the country you’re serving, enter your original currency here, and Google will convert it.
7. Check & fix errors and warnings of the uploaded products.
An error will prevent the product from being featured on Google Shopping, but a warning is merely a suggestion and will enable the product to be posted. Consistently identify and resolve the most frequent errors you may encounter.
Log in to your Google Merchant Center account and navigate to Feeds and the feed’s name to check the issues and warnings. You may find the details at the bottom of the Status tab. It will provide samples of products that include the error or warning and does not show every product with a fault. To view the information for a specific product, click the Show item button.
8. Upload merchant feed
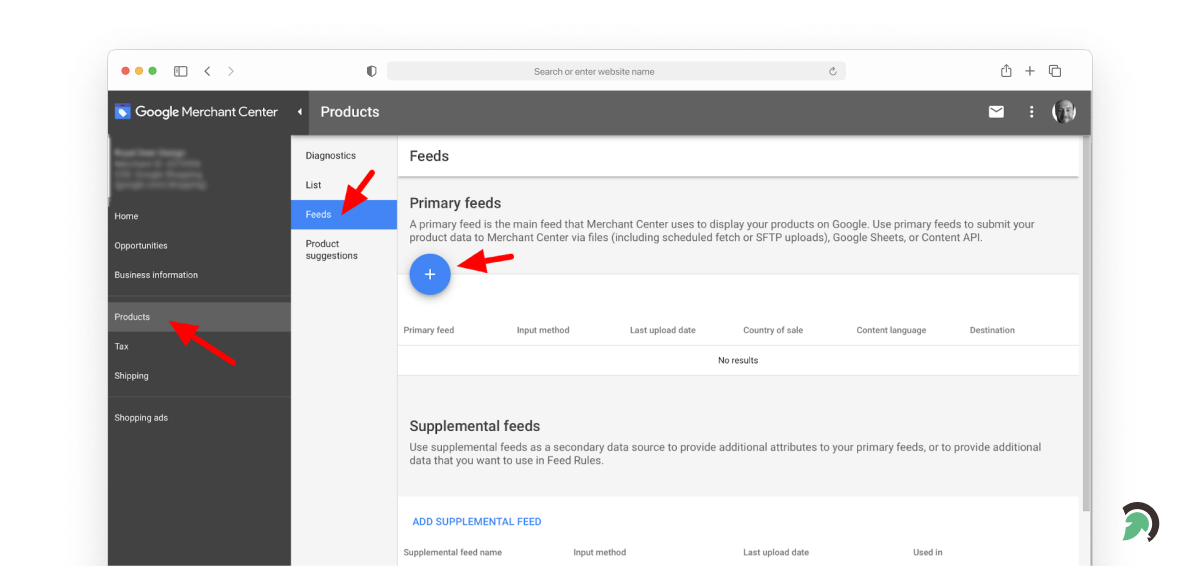
Uploading your items via a feed rather than individually will save you significant time and effort, enabling you to do bulk optimization and edits.
Here are three methods for uploading your feed:
- Upload via a URL that links to the feed – This option is ideal for merchants of all sizes that have generated their feed using a tool like Google Sheets or a third-party management platform.
- Upload a file from your local drive (for example, an Excel spreadsheet) – This option is suitable for merchants with few goods or those who seldom need to change their feed.
- Upload through an FTP connection – This method is preferred for all merchants, especially those who want to make multiple daily feed changes.
9. Track your product performance
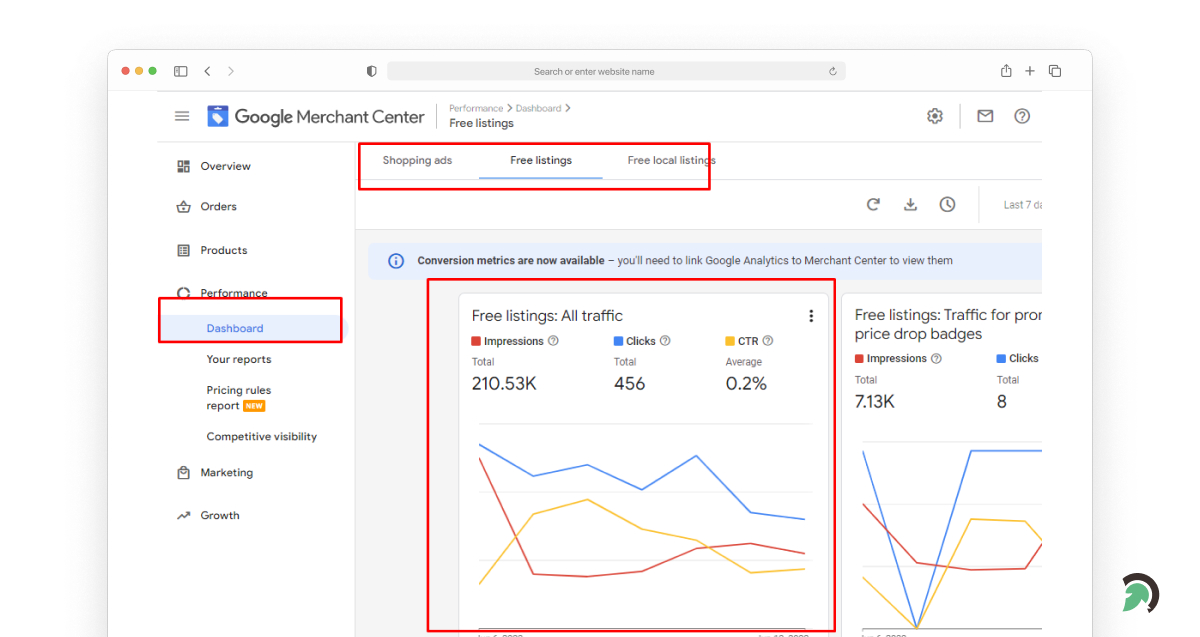
View the performance reporting section of your Merchant Center account to track traffic. This data is accessible for Shopping ads, Buy on Google, and free product listings. You should utilize your Google Ads account to get a complete picture of your product’s performance on Shopping ads.
If you want to measure clicks on your website or application, you may use a third-party or custom web analytics solution to set up tracking (for example, Google Analytics). Clicks from purchases in your Merchant Center account will appear automatically in these tools. It would be best if you double-checked that the split between Google Ads traffic & free listing traffic is correct.

Buy on Google is a cost-effective and commission-free checkout experience, allowing customers to purchase products directly from Google shops. Merchants list and explain their products, and return policies, shipping services, and payment details are automated and pre-configured in the Google Merchant Center.
Then, when customers find out things while browsing Google, they can quickly checkout as they explore by clicking the Google shopping cart and paying with the payment information they’ve saved on Google – all without leaving the platform.
11. Link your account with Google Ads and Google Analytics
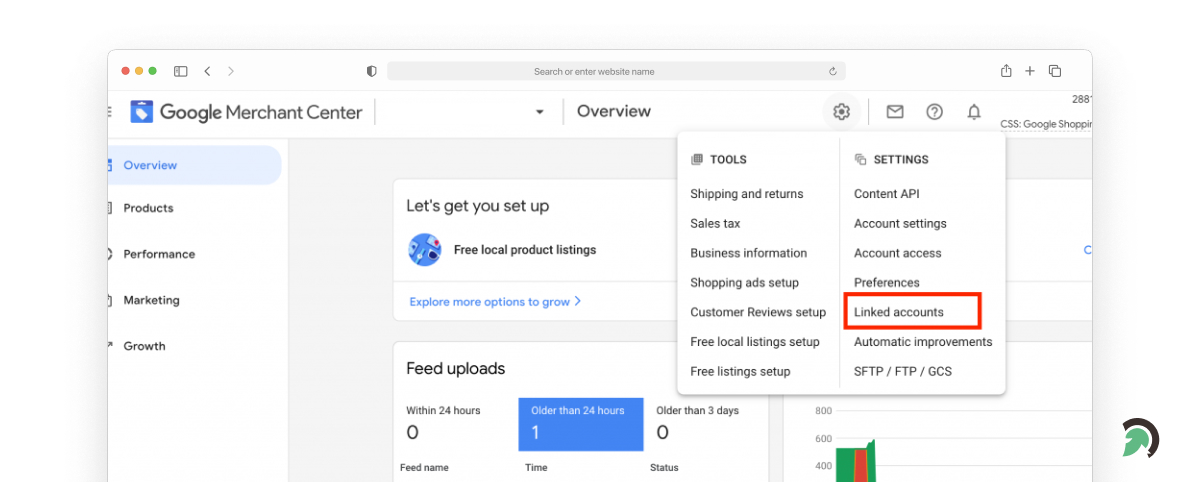
The Google Merchant Center gathers information on the products you sell in your online store. This data may then be used to build advertising, particularly remarketing campaigns. As a result, you must connect it to Google Ads. When you link to the Google Merchant Center, you will profit from many different advertisements, much like when you link your Google Ads account to Google Analytics.
Google Analytics, on the other hand, will display advertising statistics regarding the things you are promoting, such as impressions or clicks. It may be used to optimize your ads or to change your inventory.
12. Expand your reach to other countries
Businesses may showcase their products to new audiences and enhance sales by expanding to other Google Shopping countries.
However, like with any business choice, merchants should do due research to ensure that their products are a suitable match in those overseas regions and that their current operations enable them to sell within Google’s guidelines effectively.
Check that your product data complies with Google’s Product Feed Specifications and Shopping Standards for the target country and meets all currency and language criteria.
Merchant Center: Google for Retail
Google Merchant Center, a digital platform where online stores may publish product information used to run Google Shopping Ads (formerly Product Listing Ads). You may also process data about your online store, shipping, and taxes in the Merchant Center.
The Google Merchant Center also uploads all products displayed when searching for anything on Google Shopping.
The Merchant Center also has information about Google’s new free, organic Google products list in the Google Shopping Tab.
Why do I need Google Merchant Center?
Here are a few features that make it extremely helpful.
1. Importing customized product data sheets.
Google Merchant Center provides a wide range of descriptors (or characteristics) for your product data. When it comes to developing Shopping advertising, it allows you much flexibility. It can also help you identify a particular product or alter your approach for other items based on their results.
2. Editing and updating product data that already exists.
Editing product data is simple, enabling you to optimize products that are still active in the Shopping Feed. Google Merchant Center lets you play around with bids and oversee your advertising plan in real-time.
3. Easy connectivity with other Google products.
Google Display Network, Google Ads, and other advertising networks are integrated into the center. You’ll be able to execute complex remarketing and omnichannel advertising campaigns.
As you’re on Google Merchant Center, your Google marketing will be better managed, and your consumers will get the most relevant and up-to-date product details for your e-commerce site.
Whom Should I Reach For Managing My Merchant Account?
Google Merchant Center is a perfect place to start if you want to reach more people interested in buying the product. You may not only submit all of your products in one location, but you can also create an automatically created advertising to help you target the right people for your products.
We at EvinceDev will make using Google Merchant Center a breeze. We’ll assist you in digital marketing services including creating effective Google Shopping ad campaigns and managing your Google Merchant account. Reach us now if you’re ready to get started.
| Read here originally published blog:
How To Increase eCommerce Product Sales Via Google Shopping Free Product Listing?
0 likes · 0 comments
Maulik Pandya
1 year ago
Startup Guide: How to Validate Your Startup Idea?

Coming up with an idea for a future product, let alone turning it into action, is hardly the most challenging task. What is hard is to develop a good concept that people would be willing to pay you for it. Just because you can’t find anything on the market right now doesn’t imply you’ve come up with a great idea. A product or service like this may go mostly unnoticed by users.
According to Fund squire, over 60% of startup founders fail during the first three years of operation. It is a frightening statistic for any new entrepreneur, but you can prevent it by validating your startup idea.
Before you commence working on the project, you must do a market analysis and confirm your business idea. You must not neglect this phase, no matter how much expertise you have or how certain you are in your best startup ideas.
Looking for the million-dollar startup ideas to turn into the next big name in the market? Here are the 18+ trending startup ideas that you should look for!
In this post, we’ll explain how to evaluate a startup idea, whether it’s a web-based system, a mobile phone app, or a software product.
What Is Idea Validation In A Startup?
Testing a product idea in the real world, collecting data, facts, and analytics around the idea through tests, and making clear choices regarding the potential of the idea is known as idea validation. It is an essential part of a new firm startup, a custom mobile app development company, and it helps you in the following ways:
- Reduce the possibility of developing and investing in the wrong project.
- Startup idea validation results in the rapid development of market-leading services.
- It saves money.
- Reveals the actual demand for the product.
- Gather information about the best time to launch.
- It demonstrates that it may efficiently promote the product.
Even if you’re a first-time startup entrepreneur or have numerous firms in your portfolio, every new firm should provide a solution to an issue worth solving.
Reasons for Startup Fail
Numerous startup failures are attributed to a lack of finances and an inability to implement the idea. The fundamental cause is a lack of research in marketing plan validation, concept validation, potential, and a lack of a suitable idea validation method.
According to a CBInsights survey, the number one reason startups fail is a lack of market demand, when a product or an idea, no matter how creative or ground-breaking, lacks a sustained degree of market demand.
However, many aspiring entrepreneurs go headfirst into developing their Minimum Viable Product (MVP) based on their opinions and assumptions about the qualities of their concept before examining whether or not there is an actual demand for their idea.
It is critical to validate your business startup ideas before proceeding with any implementation. It is to avoid wasting time and money developing a product or service when there may be no market demand for it.
How To Validate A Product Idea?
If you feel your idea will solve a genuine problem for the target audience, you should engage with prospective customers and test it before working on it. This article will walk you through the process of testing a startup concept. To begin, you should conduct primary and secondary research to validate your idea, which may include:
Primary Research
![Primary Research for Startup Idea Validation - Primary Research
Customer =D & EN
= L
= J
|
v
[CA CLOICS 1 ¢ N= ; Product
|]
LJ )](https://contents.bebee.com/users/id/BBny662bd7f5dada42/post/WuqM862c6add8700fe/pr3t7.jpeg)
1. Who is your customer?
You’re already setting yourself up for failure if you say “everyone.” Make a point of being specific and identifying the target market. For example, if your customer is a company, respond: What type of business is it? What is the usual size of a business? In a particular market? What is the buyer’s legal name?
2. What problems are you solving?
Many entrepreneurs start with the product – they focus on the features, deploy the product, and then complain about why it isn’t gaining momentum. The recommendation is, to begin with, the problem. It entails being clear about the challenges your solution answers. You may validate whether clients regard these concerns as problems by writing them down. And, maybe more crucially, whether customers believe these are problems worth addressing.
3. How does your product solve those problems?
Only when you’ve set down the problem can you go on to the product. From here, you may immediately relate the value of your product to customer concerns. How can resolving their difficulties improve their lives? Is it making them extra money? Does it look better?
4. What are the key features of the product?
The features must be more than great; they must solve particular problems—the more quantifiable (e.g., time saved, money earned), the better. We advise you to think about Minimum Viable Product and keep the feature set as simple as feasible (You must offer quite enough value for specific customers to purchase).
Secondary Research
1. Interview your customers
When we speak of interviewing, we’re not referring to a quick chat (or worse, a survey). Begin with a list of questions, but wander from the list as you understand more. Begin the conversation with a feeling of interest in the customer’s problem and wants, and you’ll gain a lot of helpful information.
2. Value Proposition
We advise entrepreneurs to emphasize less on features and more on describing their product’s value proposition. What does this imply? A value proposition describes the anticipated benefits that a consumer will obtain from utilizing your product. Value might be quantifiable, such as time saved or income generated, and it is typically simple to measure.
However, the value may also be qualitative, such as pain alleviation or lifestyle advantages provided by your product. You may differentiate your product from the competition by adequately analyzing and recording this qualitative value through user interviews.
3. Market Fit
Don’t be disheartened if it proves your assumptions incorrect early on. It is conceivable that you will not have attained product-market fit and that a change in direction is all that is required.
Use the input form validation to enhance your proposal continually and address any possible roadblocks before implementation. Many business entrepreneurs also opt to pivot their concepts, reframing the problem and its solution.
If you decide to undertake your research, the following online resources may be helpful:
- Google: If you’re confused, Google it. To perform complete research, use any search engine; however, if you need to go in by looking at patterns relevant to your service or product, tools like Google Ads, Google Trends, and Google Analytics come in helpful.
- LinkedIn: LinkedIn is not just a networking site; it may help you learn about your competitors and decision-makers in your business.
- Quora & Reddit: These are kind of out of the ordinary, but they do reveal insights into the minds of actual individuals. Join relevant communities and use them to generate feedback and validate your product ideas.
Validate Your Startup Idea
A learning-driven approach is critical to the success of any innovative startup idea – but it necessitates keeping an open mind and sometimes getting your hands dirty. You won’t reveal the truth about the practicality and worth of your business concept in your thoughts or even in your workplace. You’ll know about it through the perspectives and experiences of genuine, unbiased people, so get in touch with them as soon as possible.
The importance of testing in identifying and managing risks cannot be overstated. It’s also critical to give you the information and flexibility to make any changes as the project progresses and pivot to ensure the product delivers on its promise.
There are standard startup validation systems that you may use to do this validation and testing and a variety of approaches that will allow you to check your assumptions in a pretty simple and low-cost manner.
Like your personal kid (if you have one), your expanding business concept will have the opportunities to grow and develop through experience and experimentation. It cannot, however, evolve in isolation. So leave the building and put your assumptions to the test in the real world.
| Originally published at: How to validate an idea for a startup
0 likes · 0 comments
Maulik Pandya
1 year ago
A Digital Engagement Experience: Patient Engagement Platform; how does it work, and what are the essential features?

Patients have begun to use telehealth (telemedicine) technologies and other digital channels to receive healthcare services, while the COVID-19 pandemic has limited face-to-face involvement. The demand for healthcare technologies will rise in the future as digital healthcare expands. Patients expect healthcare providers to know them personally and give more personalized and meaningful experiences.
While teleconsulting does not replace the real presence of healthcare professionals, it does provide valuable information, which is urgently required. Telemedicine is the critical care approach that improves patient engagement today, with stay-at-home rules, social distancing, & lockdowns. Customized patient engagement develops patient confidence and promotes care continuity. As a result, patient engagement platforms will be vital in times of pandemic and beyond.
What is patient engagement?
Before digging into the basics of patient engagement software, it’s necessary to define and contextualize what patient engagement is and why it’s vital to healthcare professionals and organizations. Patient engagement is a generic term referring to a patient’s engagement in healthcare services. Any patient and healthcare environment can be considered “patient engagement,” covering inpatient treatment, emergency room visits, retail clinics, and outpatient settings such as doctors’ offices, outpatient imaging centers, etc.
Healthcare providers value patient engagement as it has been proved to improve patient outcomes and lower healthcare spending. Getting a high level of patient engagement can help to prevent rehospitalizations and unnecessary treatments, speed up patient payments, improve adherence to treatment plans, and assist in early disease diagnosis, among other things.
Driving patient engagement in an inpatient or hospital setting often entails including patients in daily rounds. Even using technology to make education more consistent and follow up with patients after discharge, outpatient settings confront the unique challenge of engaging patients all over multiple entry points to the patient care. These are some of the entry points:
- Scheduling
- Registration
- Check-in
- Appointments
- Post-visit feedback
- Billing
- Patient recalls
- Patient education
Why is engagement critical in health and social care?
Patient engagement is becoming more widely recognized as an essential aspect of healthcare and a key component of providing safe, person-centered services. More engaged patients can make better intelligent decisions about their alternative treatments. Furthermore, it may better utilize resources if they are matched with patients’ goals, which is crucial for the long-term viability of health systems worldwide.
People who use health services demand higher health care systems that are more responsive, open, and transparent. They need practitioners to assist them in the decision-making processes. However, individual patients’ preferences for such engagement may differ significantly.
Multiple competing priorities exist for health care providers, which may contradict patient safety at times. Organizational, social, healthcare, and self-esteem priorities are only a few examples. Patients’ safety and well-being, on the other hand, are vital motives, and they can make this a priority in the health care they get.
Primary care doctors best handle patients’ overall health, conditions, healthcare needs, and personal needs and values. Patients who are better informed are more prone to feeling comfortable reporting positive and negative outcomes, and they are more likely to stick to agreed-upon care management plans. It improves the quality of care and promotes learning and improvement while lowering adverse effects.
What is a patient engagement platform?

A Digital patient engagement platform is a solution that allows patients to communicate with their doctors via their smartphone, tablet, or pc. It connects clinicians, patients, and third-party patient engagement system companies, allowing individuals to participate in their treatment even when not in a hospital.
When correctly and effectively deployed, patient engagement platforms can aid with streamlined access to medical data, scheduling appointments, patient self-scheduling, and treatment plans.
Even though adoption has slowed, patient engagement systems and other associated solutions are likely to become permanent aspects of the healthcare setting. According to a 2021 market analysis, the global market for patient engagement technology is expected to reach $41.20 billion by 2027.
What are the must-have features of Patient Engagement Software?
When developing bespoke software, features are vital, and patient engagement software development is no exception. Choosing the appropriate features allows you to make your software more competitive and helps you save a considerable amount of money.
So, below are a few features that you must include in developing your patient engagement software.
1. Electronic patient intake forms for online and in-office use
The option for patients to finish the registration process themselves is the number one feature that practices expect to see in a modern patient portal. A user-friendly patient portal allows new patients to register from the comfort of their own homes using a computer or other connected device. This technique also eliminates the typical in-office registration method of using paper and a clipboard. Patients can complete their registration requirements on a tablet or computer as soon as it arrives for their appointment. It allows administrative employees to concentrate on more important concerns.
2. Submission of a medical history

Patients are usually required to fill out a health history form when they visit the doctor. It’s usually a sheet of paper attached to a clipboard. Modern offices may have switched to tablet pcs. There’s no justification why a patient shouldn’t enter their health history online before visiting the doctor because it needs to get into the computer system. It could allow the patient to spend more time with their clinician and less time in the waiting room.
3. Bill payment
![Patient Engagement Platform: Bill payment - Ci]
payment](https://contents.bebee.com/users/id/BBny662bd7f5dada42/post/slwHq62c6abf1c4415/IFuHu.jpeg)
Many people are using their phones to make mobile payments these days. According to the Federal Reserve of the United States, 28% of all smartphone users have made a mobile payment in the last year. When personal computers are factored in, the percentage of homes that use online bill payments rises to almost 82%. Incorporating this feature onto a patient portal could enhance bill payment frequency.
4. Appointment reminders

Engaging patients should begin before the patient even leaves the house. As missed appointments are expensive, it’s critical. According to Healthcare Finance News, missed appointments cost the US healthcare system more than $150 billion every year. Reminders sent by phone, text, or email could help recoup some of the lost revenue while also promoting the treatment of preventable diseases.
5. Automated lab results

Patients awaiting lab results should not be forced to wait on their phones for a call. After all, lab results are a type of notification, similar to those that apps send out on cell phones. A user receives an inconspicuous notification when they have an unread message, and a patient portal can accomplish the same thing. When lab results are ready, they should be made available online.
6. Health record viewing

Patients should have access to their medical records. Despite this, just 63 percent of patient portals allow it. Patients are more likely to become more engaged in their health if they have access. According to the International Business Times, one out of every ten dollars spent on hospital-based care is wasted on unneeded hospital stays. The first step toward really preventing those situations is to increase engagement.
7. Appointment scheduling

People are increasingly quitting their landlines in preference for smartphones. Despite this, fewer individuals use their phones to make calls. 80% of millennials are particularly irritated by phone calls, preferring to send an instant message. Doctor’s offices must evolve to keep up with the times. While doctors are unlikely to quit their landlines anytime soon, they should provide patients with the option of scheduling appointments online.
| Originally published here: Patient Engagement Platform
0 likes · 0 comments
Maulik Pandya
1 year ago
Top 9 Website Design Best Practices You Need To Know

UI trends may come and go, but certain aspects of web design are never going away. These best practices help you enhance the overall experience of your site visitors and increase the chances of conversions.
48% of users believe website design is the top factor when judging a business’s credibility. However, they take less than 0.05 seconds to form an opinion about a website after it loads.
These numbers indicate that it is vital for you to successfully follow the web design best practices to create a website for today’s consumers. This article will discuss top Nine website design trends to help you stay ahead of the game. Let’s get started!
1. Consistent Branding
The best website design has one thing in common: consistent branding.
Consistent branding makes your business more recognizable and gives you a robust online presence. It also helps build confidence and trust in your business, thereby increasing conversions.
Consistent branding includes everything from colors and fonts to words and layout. They don’t need to be noisy or overdone; instead, they should evoke an emotional response.
Here are some tips to ensure consistent branding while designing a website:
- Every element of your website should reflect your brand guidelines. These guidelines should include brand mission, logo design colors, fonts and typography, and tone of voice.
- Ensure that all your employees have the necessary brand materials available at their disposal.
- Have menus in the same position on each page.
- Keep the fonts and colors the same throughout the website.
- Ensure that your logo takes visitors to your homepage.
- Repeat layout styles to give all your pages a predictable form.
2. Minimalist And Content drill down
Minimalist and Content drill-downs refer to adding compelling visuals that entice users into clicking to know more. Visuals are attractive and can grab people’s attention more quickly than texts.
This can benefit in two ways:
- First, only interested users will click on the visual. They are likely to spend more time on your website, increasing the average time spent and reducing the bounce rate.
- Second, they allow you to fit more content in less space. Also, visitors can scan visuals that matter the most to them quickly.
However, you should follow the best practices to get the most out of your efforts.
- Add compelling visuals to grab users’ attention.
- Use click triggers that communicate benefits to increase the chances of click-through rate further.
- Ensure that you include a CTA and that the button’s text is large enough to attract eyes.
- Use persuasive copy that complements your visuals.
- Ensure that the drill-down is mobile-friendly.
One of the prominent examples of drill-downs is W3Schools. It provides limited content on its homepage with compelling copy, examples, and “learn more” buttons.
3. Minimize Text
While words help you provide information about your products and services, keeping texts to a minimum is essential. Ensure that your website has enough white space so it looks simple yet easy to understand.
One of the best examples of minimizing text and maximizing white space is Google. Their homepage has lots of whitespaces so users can focus on what matters the most: searching for information.

Remember, white space doesn’t necessarily mean that the area needs to be white. Instead, it means empty spaces to make users focus more on your text.
One of the best ways to minimize text while sharing essential details of your product is by leveraging copywriting. It involves writing content in a way that persuades visitors into converting without using too many words.
4. Make Your CTA Stand Out
CTA (call-to-action) button guides users into taking action. Therefore, it should be both compelling and persuasive to generate conversions.
A simple change in a button increased the annual sales of an eCommerce company by $300 million. Therefore, it is crucial to make your call-to-action button stand out.
Here are some ways to make your CTA stand out:
- Leverage color psychology to ensure your button pops up and attracts eyes. For example, if you have a light background, use a little bright color (like orange, blue, or red) to make your CTA stand out.
- Test different button shapes, such as rectangle, round, or rounded edges.

- Test different CTA copies, depending on the action you want to take. This will help determine what works best for your employees.
- Include persuasive words in your CTA, such as you, easy, guarantee, today, new, proven, and free.
- Keep the CTA above the fold. However, you can also try different placements to determine what brings more conversions.
- Use a single CTA on a page. More than one CTA will confuse visitors and reduce the chances of sales.
5. Interactive and Intuitive Designs
Intuitive and interactive design refers to creating simple, meaningful media that encourage users to engage with your website.
Here’s an example to help you better understand what intuitive design is and how you can use it to your benefit.
Designed for an eatery, the primary purpose of this page is to highlight the services a restaurant provides. Instead of creating different pages for everything, this page showcases different services provided by the restaurant. The black and white design makes it even more intuitive.
That said, follow these two strategies to get the most out of this web design trend:
- Your design should be very people-centric. Consider your buyer personas and user scenarios when creating the design.
- Using the design should be effortless. The less time a user pays to figure out how to use your interactive design, the more they can accomplish the task you want.
You can use tools like Figma to create intuitive, interactive designs for your website. It also allows you to bring your team together and brainstorm ideas via an online whiteboard.
But remember, intuitive design is meant to make your customers’ life easier, not complex. Thus, make your designs easy to understand and navigate. If you are not sure how to do that, it’s better to take help from expert UI/UX design services to get the desired results with minimal effort.
6. Horizontal Scroll
When every website follows the vertical scroll norm, you can stand out by leveraging horizontal scrolling. One of the best website design practices, horizontal scroll, can catch people’s attention, keep them on your site for longer, and make their experience memorable.
However, it is good to know that horizontal scrolling is not ideal for all websites. But if you are creating a:
- Portfolio Website
- Catalog Website
- Online Galleries
For example, Evince Development, A Full-Stack Development Agency, follows the web design best practices for horizontal scroll to showcase its work. However, it also allows visitors to skip an image by directly clicking on the dot (.).
- Post regularly on Facebook to let your followers know about your latest offerings (customers are more likely to follow if you publish content regularly).
- Integrate social reviews to build trust with website visitors and encourage them to purchase from you.
Another benefit of adding social buttons on your website is that social shares improve your social signals and drive traffic to your site, indirectly affecting your SEO.
8. Video Embedding
74% of marketers say video has a better return on investment than static images. In addition, 87% of marketers say video has increased traffic to their website.
That’s not it. Here are some more statistics about video embedding:
- 94% of people report watching explainer videos to learn more about a product, with 84% ending up making a purchase.
- The average user spends 88% more time on a website with video.
- Over 82% of internet traffic will be online videos by 2022.
These numbers themselves indicate the importance of video embedding in the website. However, it needs to be done efficiently. If not, it will increase your page’s weight, directly affecting the loading time.
Here is how you can leverage this web design trend to get the most out of your efforts:
Place short videos on the top section of your homepage. Make sure it autoplay (without sound) when a user lands on your website. Alaska Tours is a great example of a website that leverages video at the top of the site.

Here’s how to make the best website design using negative colors and dark theme:
- Use dark grey instead of pure black as it has less contrast and makes the site look more appealing.
- Ensure your content is easy to read in a dark theme. You can use lighter tones (colors in the 200-50 range) as they have better readability in dark backgrounds. We recommend using a text-to-background contrast level of 15.8:1.
- Avoid using fully saturated colors on dark backgrounds.
- Use the right “on” colors on your text to make it more readable.
- If you have a light or standard mode, don’t just invert the colors to get the dark theme. Instead, choose all your elements carefully to provide the best experience to your visitors.
Wrapping Up
Following the best web design increases your chances of providing a memorable experience and converting visitors into customers. The seven web design trends can help you stand out from the crowd and enhance the overall experience.
Not sure how to create the best website design? Leverage EvinceDev’s Custom Web Design Services to get a compelling, persuasive website and increase your conversion rates. You can also check out its Graphics Portfolio to help you make the decision.
| Read here originally published blog:
0 likes · 0 comments
Do you want to manage your own group?
