Migrate RAID disks to LVM volumes
Goal: Migrate data from existing Raid5 Array to lvm partitions
Action: Current raid5 disk array is having 4 disks, we have to remove one by one disk from /dev/md0 raid5 array and use them for the lvm partitioning scheme. Once lvm created from the raid disks (/dev/sdb8) we’ll copy our data from existing raid array to lvm mount point.
Copy Raid5 data to newly created lvm partition(/dev/vg1/lv1) mount point /lv1
Once we are copied whole data from the raid5 to lvm, we’ll wipe out /raid5 devices and use them in newly created lvm.
First, we need to convert all raid devices from 'Linux raid autodetect' to 'Linux LVM'
Then we have to create pv for all three devices
Then vgextend for the existing volume group vg1
Then lvextend for exiting lvm partition mounted on /lv1
Resize the filesystem type
Put entry inside /etc/fstab file
[root@node1 ~]# mdadm -D /dev/md0
![[root.@nodel
/dev/mdo:
Version
Creation Time
Raid Level
Array §
Used Dev Size
Raid Devices
Total Devices
Persistence
LC
Update Time
State
Active Devices
rking Devices
Failed Devices
RISES SERIA Nel)
W
Layout
Chunk Size
Consistency Policy
Eu
uuIn
Fvents
Number Major
0 8
I 8
2 8
) 8
t@nodel ~)§
~1# mdadm -D /dev/md0
1
Fri Dec 16 01:23:30 2022
[RES]
ERIC RTE)
1046528
)
)
Superblock
(2.99 GiB 3.21 CB)
(1022.00 MiB 1071.64 MB)
1s persistent
Mon Dec 19 09:26:43 2022
clean
4
4
left-symmetric
B34
jgeRAv iT
nodel:0 (local to host nodel)
A121¢741:8d67253eece0141d: 44144641
A
RN Raidhevice State
21 0 active sy /dev/sdbh
22 I active /dev/sdbé
A] 2 active sy JAS EVs oy)
px! E] active sy /dev/sdb8](https://contents.bebee.com/users/id/ZOS5h63dbee61e7dc1/article/migrate-raid-disks-to-lvm-4iXM9slDksmb/eKmah.png)
Check mount point and raid array name, check disk size as well.
[root@node1 ~]# df -h
![[root@nodel ~]§ df -h
|W EEY Size
devimpts JI
tmpfs JI
tmpfs JI
tmpfs JI
/dev/mapper/centos LEH
/dev/mdo ATS
/dev/sdal LEAR
[RS 280M
[root@nodel ~)§ [ |
9.1M
195M
NEE
LEE
LEE
LEE
LEE
IRIS
RRs
EVAN]
280M
ounted on
/dev
/dev/shm
/run
vs/ts/cqroup
1s
JATRLSE
/boot.
/run/user/0](https://contents.bebee.com/users/id/ZOS5h63dbee61e7dc1/article/migrate-raid-disks-to-lvm-4iXM9slDksmb/h1SPj.png)
Mark commented on raid5 mount point in /etc/fstab so it won’t be problem in case we need reboot to update partition tables as we’ll be going to use existing disk into the lvm partition.
[root@node1 ~]# vim /etc/fstab

Mark fail any single device which you want to remove from the existing raid5 array (/dev/sdb8)
[root@node1 ~]# mdadm /dev/md0 --fail /dev/sdb8
![[root@nodel ~]# mdadm /dev/md0 --fail /dev/sdb8
mdadm: set /dev/sdb8 faulty in /dev/md0O
[root@nodel ~]§ [ |](https://contents.bebee.com/users/id/ZOS5h63dbee61e7dc1/article/migrate-raid-disks-to-lvm-4iXM9slDksmb/mCG87.png)
Unmount raid5 mount point
[root@node1 ~]# umount /dev/md0
Remove failed disk from the array which was failed in last command /dev/sdb8
[root@node1 ~]# mdadm /dev/md0 --remove /dev/sdb8
![[root@nodel ~]# mdadm /dev/md0 --remove /dev/sdb8
mdadm: hot. removed /dev/sdb8 from /dev/md0O
[root@nodel ~]§ [ |](https://contents.bebee.com/users/id/ZOS5h63dbee61e7dc1/article/migrate-raid-disks-to-lvm-4iXM9slDksmb/2GsYX.png)
Check existing array should report failed/remove device from the raid5 array /dev/md0
[root@node1 ~]# mdadm -D /dev/md0
![[root@nodel ~]1# mdadm -D /dev/md0O
JAS E74 SON]
Version : 1.2
Creation Time Fri Dec 16 01:23:30 2022
Raid Level raidh
Array Siz 3139584 (2.99 GiB 3.21 GB)
Used Dev Size 1046528 (1022.00 MiB 1071.64 MB)
Raid Devic ]
Total Devices E]
Persistence Superblock is persistent
Mon Dec 19 09:43:45 2022
clean, degraded
Update Time
State
Active Devices 03
Working Devic FE)
Failed Devices © 0
Spare Devices : 0
Layout
Chunk Size
left-symmetric
RNA
Consistency Policy : resyne
Name : nodel:0 (local to host nodel)
A121¢741:8d67253c10000141d: 44144641
[AVIS RII AV
ISIPHSTee Major SERN RaidbDevice State
0 15} 21 0 active sync /dev/sdbh
I! 15} Vy I! active sync /dev/sdb6
2 15} Vai 2 active sync /dev/ sdb
0 E] removed
& 0
[root@nodel ~]§ [|](https://contents.bebee.com/users/id/ZOS5h63dbee61e7dc1/article/migrate-raid-disks-to-lvm-4iXM9slDksmb/Tuuid.png)
Resize existing raid5 as one disk has been removed from the array.
[root@node1 ~]# resize2fs -P /dev/md0
![[root@nodel ~]1# resize2ts -pP /dev/md0
g ze2is 1.42.9 (28-Dec-2013)
stimated minimum size of the filesystem: 26476
t@nodel ~)§](https://contents.bebee.com/users/id/ZOS5h63dbee61e7dc1/article/migrate-raid-disks-to-lvm-4iXM9slDksmb/owi1P.png)
Check raid status it should not have any current process going on, and should show 1 removed device (you can see there is only 3 U’s inside the bracket [UUU_]
[root@node1 ~]# cat /proc/mdstat
![@nodel ~1# cat /proc/mdstat
nalitiecs : [raidé] [raidb] [raid4d]
md : active raid) sdbb [0] sdb7([2] sdb6[1]
3139584 blocks super 1.2 level 5, 512k chunk, algorithm 2 [4/3] [UUU |]
unused devices: <none>
[root@nodel ~)§](https://contents.bebee.com/users/id/ZOS5h63dbee61e7dc1/article/migrate-raid-disks-to-lvm-4iXM9slDksmb/U7CJQ.png)
Check and update filesystem accordingly for the raid5 array
[root@node1 ~]# e2fsck -f /dev/md0
![[root@nodel ~]& e2tsck -f /dev/md0o
sek 1.42.9 (28-Dec-2013)
Checking inodes, blocks, and sizes
Checking directory structure
Checking directory connectivity
Checking reference counts
: Checking group summary information
/dev/md0: 16/196224 files (0.0% non-contiguous), 310167784896 blocks
[root@nodel ~18](https://contents.bebee.com/users/id/ZOS5h63dbee61e7dc1/article/migrate-raid-disks-to-lvm-4iXM9slDksmb/u0rK4.png)
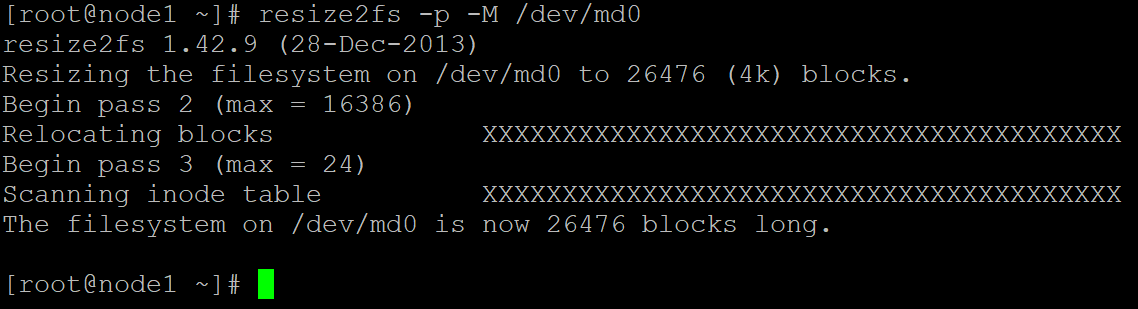
Shrink the filesystem (-M) and print (-p) progress of the shrinking so once shrinking completed, we can go ahead for the next operation.
[root@node1 ~]# resize2fs -p -M /dev/md0
To check array-size show /dev/md9 detail from the below command and record array size.
[root@node1 ~]# mdadm -D /dev/md0
![[root.@nodel
JAS E74 SON]
NZS EARN
Creation Time
Raid Level
Array Size
Used Dev Size
Raid Devices
Total Devices
Persistence
Update Time
State
|DISAVAREIexH
EARS
|DISAVAREIexH
|DISAVAREIexH
LAL IRIs)
Working
JERR RSs]
Spare
Layout
Chunk Size
Consistency Policy
Name
uuIn
Fvents
IS[FhsTe a J ERT
0 8
I 15}
2 8
- §
]
| root. @nodel ~| 8 [1]
~1# mdadm -D /dev/md0O
1
Fri Dec 16 01:23:30 2022
raidh
BARE
1046528
]
E]
Superblock
(2.99 GiB 3.21 GB)
(1022.00 MiB 1071.64 MB)
is persistent
Mon Dec 19 09:55:58 2022
clean, degraded
E]
E]
0
0
left-symmetric
RNA
resync
nodel:0 (local to host nodel)
4121¢741:8d67253c100c0141d: 44144641
a
[IRiIete RaidDevice State
21 0 active sync /dev/sdbh
22 I active sync /dev/sdbé
Vai 2 active sync /dev/ sdb
0 E] removed](https://contents.bebee.com/users/id/ZOS5h63dbee61e7dc1/article/migrate-raid-disks-to-lvm-4iXM9slDksmb/XM7h9.png)
Need to adjust /dev/md0 array, so copy array-size from above command
[root@node1 ~]# mdadm --grow /dev/md0 --array-size 3139584
Resize existing array once again to update the existing disk array size
[root@node1 ~]# resize2fs /dev/md0
![@nodel AS r
e2is 1.42.
zing the {110s
The filesystem on Jed /md0 [RSE Stet] HOYT blocks 1
size2ts /dev/mdO
y Dec=-2013)
SITeH
[Bat
t.@nodel ~ 8 [ |
on /dev/md0 to 784896 (4k) blocks.](https://contents.bebee.com/users/id/ZOS5h63dbee61e7dc1/article/migrate-raid-disks-to-lvm-4iXM9slDksmb/SAHxA.png)
Now active device size reduced to 3 disk device array
[root@node1 ~]# mdadm -D /dev/md0
![[root.@nodel
/dev/mdo:
NZS EARN
Creation Time
Raid Level
Array Size
Used Dev Size
Raid Devices
ESHER ER IARS
Persistence
Update Time
State
PISIVAREIeN
Devic
PISIVAREIeN
PISIVAREIeN
LAS RIS:
LIS Sse]
JERR RSs]
Spare
Layout
Chunk Size
Consistency Policy
Name
uuIn
Fvents
NIFH TSE J ERT
0 8
I 15}
2 15}
- 0
~1# mdadm -D /dev/md0O
1
Fri Dec 16 01:23:30 2022
raidh
BARE
1046528
]
E]
Superblock
(2.99 GiB 3.21 GB)
(1022.00 MiB 1071.64 MB)
is persistent
Mon Dec 19 09:58:36 2022
clean, degraded
3
3
0
0
left-symmetric
RNA
resync
nodel:0 (local to host nodel)
4121¢741:8d67253c100c0141d: 44144641
al
[IRiIete Raidhevice State
al 0} active sync /dev/sdbh
22 I active sync /dev/sdbé
Vai 2 active sync /dev/ sdb
0 E] removed](https://contents.bebee.com/users/id/ZOS5h63dbee61e7dc1/article/migrate-raid-disks-to-lvm-4iXM9slDksmb/jy1Qd.png)
Reboot to update the partition table
[root@node1 ~]# reboot
Mount raid5 array and check data inside the raid5 mount point, we will go ahead and copy this data to lvm partition
[root@node1 ~]# mount /dev/md0 /raid5/
[root@node1 ~]# ls /raid5
![[root@nodel ~1§ ls /raidb
dirl dir? filel helloworld lost+found profile
[RESIS N CI STS (SR IE IF |]](https://contents.bebee.com/users/id/ZOS5h63dbee61e7dc1/article/migrate-raid-disks-to-lvm-4iXM9slDksmb/kfAJI.png)
[root@node1 ~]# wipefs -a /dev/sdb8
![[root@nodel ~]1# wipetfs -a /dev/sdb8
/dev/sdb8: 4 bytes were erased at offset 0x00001000 (linux raid member): fe de 2b a9
[root@nodel ~]§ [ |](https://contents.bebee.com/users/id/ZOS5h63dbee61e7dc1/article/migrate-raid-disks-to-lvm-4iXM9slDksmb/XXQuP.png)
Changed type of partition 'Linux raid autodetect' to 'Linux LVM'
[root@node1 ~]# fdisk /dev/sdb
![Command (m for help): t
Partition number (1,5-8, default 8): 8
Hex code (type I to list all codes): Se
Changed type of partition 'Linux raid autodetect! to 'Linux LVM!
Command (m for help): p
Disk /dev/sdb: 16.1 GB, 16106127360 bytes, 31457280 sectors
Units sectors of 1% 512 512 bytes
Sector size (logical/physical): 512 bytes / 512 bytes
1/0 size (minimum/optimal): 512 bytes / 512 bytes
Disk label type: dos
Disk identifier: Oxabd3676%
Device Boot Ri¥tad 13313] Blocks Id System
/dev/sdbl 2048 EARINY MEE] ERMAN) 5H Extended
/dev/sdbh 4096 2101247 LEE RYEY fd Linux raid autodetect
/dev/sdbé 2103296 LAE LEE RYEY fd Linux raid autodetect
/dev/ sdb 4202496 6299647 1048576 fd Linux raid autodetect
/dev/sdb8 6301696 8398847 LEE RYEY 8¢ Linux
LVM](https://contents.bebee.com/users/id/ZOS5h63dbee61e7dc1/article/migrate-raid-disks-to-lvm-4iXM9slDksmb/9DsSH.png)
Create new lvm from the raid5 wiped disk and copy data from /raid5 array to newly created and mounted lvm partition /lv1
[root@node1 ~]# pvcreate /dev/sdb8 [root@node1 ~]# vgcreate vg1 /dev/sdb8 [root@node1 ~]# lvcreate -L +900M -n lv1 vg1 [root@node1 ~]# mkfs.xfs /dev/vg1/lv1 [root@node1 ~]# mkdir /lv1 [root@node1 ~]# mount /dev/vg1/lv1 /lv1 [root@node1 ~]# cp -r /raid5/* /lv1 [root@node1 ~]# ls /lv1 |
![[root@nodel ~1# pvereate /dev/sdb8
Physical volume "/dev/sdb8" successfully created.
[root@nodel ~]# vgcereate vgl /dev/sdbg
Volume group "vgl" successfully created
[root@nodel ~]§ lvcereate -1, 900M -n lvl vgl
Logical volume "lvl" created.
[root@nodel ~]1# mkis.xfs /dev/vgl/livl
meta-data /dev/vgl/lvl isize H12 agcecount. 4, agsize 7600 blks
K attr 2, projid32bit 1
finobt 0, sparse 0
data blocks 230400, imaxpcet 25
swidth 0 blks
[GSLENITS| version 2 ascii-ci 0 ftype 1
RSLs] internal log blocks 85%, version 2
sunit 0 blks, lazy-count. 1
blocks 0, rtextents 0
realtime none
[root@nodel ~]# mkdir /1lvl
[root@nodel ~]§ mount. /dev/vgl/lvl [lvl
[root@nodel ~]§ df -h
Filesystem Size Used Avail Use? Mounted on
devtmpts LEE 0 1.4c¢ OE VASTLY
[BUTS LEE 0 1.4c¢ /dev/shm
[BUTS 1.4G¢ 8.7M 1.46 /run
tmpfs |S 0 1.46 FAVA EaSitle)
/dev/mapper/centos-root. 13G 1.66 IRIS 1s
/dev/sdal 1014M 195M 820M /boot.
tmpfs 280M [ORS T0I | /run/user/0
Jas tea ste 2.96 9.1M 2.8G /raidb
/dev/mapper/vgl-1vl CENA] 33M 865M JAR!
[root@nodel ~1# cp -r /raidb/* [lvl
[root@nodel ~1§ 1s /1vl
dirl dir? filel helloworld lostifound profile
[root@nodel ~18](https://contents.bebee.com/users/id/ZOS5h63dbee61e7dc1/article/migrate-raid-disks-to-lvm-4iXM9slDksmb/8B7nI.png)
We can see raid5 data is on the newly created lvm partition, now if we are okay and confident that we have copied all the data from the raid5 and accommodate in the newly created lvm partition then it would be safe to remove raid array from the system.
Be careful: please double check data and its size on the newly created lvm partition and then only do the below operation.
Remove all the disks from the existing array.
[root@node1 ~]# mdadm /dev/md0 --fail /dev/sdb7
[root@node1 ~]# mdadm /dev/md0 --remove /dev/sdb7
![[root@nodel ~]# mdadm /dev/md0 --fail /dev/sdb7
mdadm: set /dev/sdb7 faulty in /dev/md0
[root@nodel ~]# mdadm /dev/md0 --remove /dev/sdb7
mdadm: hot. removed /dev/sdb7 from /dev/md0O
[root@nodel ~]# mdadm -D /dev/md0](https://contents.bebee.com/users/id/ZOS5h63dbee61e7dc1/article/migrate-raid-disks-to-lvm-4iXM9slDksmb/aRekh.png)
Check the raid5 details and its disks which is currently participated into the raid5 array.
![[root.@nodel
/dev/mdo:
NZS EARN
Creation Time
Raid Level
Array Size
Used Dev Size
Raid Devic
ESHER ER IARS
Persistence
Update Time
State
EARS
EARS
EARS
PISIVARErS)
Ja avs
Working
JERR RSs]
Spare
Layout
Chunk Size
Consistency Policy
Name
uuIn
Fvents
NIFH TSE J ERT
0 8
I 15}
- 0
= 9)
~1# mdadm -D /dev/md0O
1
Fri Dec 16 01:23:30 2022
raidh
BARE
1046528
]
2
Superblock
(2.99 GiB 3.21 GB)
(1022.00 MiB 1071.64 MB)
is persistent
19 11:21:20 2022
| AN BB AY]
Mon Dec
clean,
left-symmetric
RNA
resync
nodel:0 (local to host nodel)
4121¢741:8d67253c100c0141d: 44144641
RE
[IRiIete Raidhevice State
al 0} active sync /dev/sdbh
Vy I! active sync /dev/sdb6
0 Yi removed
0 E] removed](https://contents.bebee.com/users/id/ZOS5h63dbee61e7dc1/article/migrate-raid-disks-to-lvm-4iXM9slDksmb/k46ek.png)
[root@node1 ~]# e2fsck -f /dev/md0
![[root@nodel ~]1# mdadm --stop /dev/md0
mdadm: stopped /dev/md0O
[root@nodel ~]1# mdadm --zero-superblock /dev/sdbb
[root@nodel ~]1# mdadm --zero-superblock /dev/sdb6
[root@nodel ~]1# mdadm --zero-superblock /dev/sdb?
[root@nodel ~]§
[root@nodel ~]# reboot [ |](https://contents.bebee.com/users/id/ZOS5h63dbee61e7dc1/article/migrate-raid-disks-to-lvm-4iXM9slDksmb/NPgNO.png)
Note: Raid5 does not allow us to remove any disk completely from raid5, having read error during the filesystem check
We have to fail and remove all the existing disks and stop raid5 array and set zero superblock for all the remaining raid devices.
[root@node1 ~]# mdadm /dev/md0 --fail /dev/sdb5
[root@node1 ~]# mdadm /dev/md0 --fail /dev/sdb6
[root@node1 ~]# mdadm /dev/md0 --remove /dev/sdb5
[root@node1 ~]# mdadm /dev/md0 --remove /dev/sdb6
As we have copied data from raid5 array, we can stop and wiped out all the disks and use them for the newly created lvm volume. We’ll extend volume group and then logical volume.
First of all, unmount /dev/md0 and set zero superblock for all the faulty and removed disks.
[root@node1 ~]# umount /dev/md0
[root@node1 ~]# mdadm --stop /dev/md0
[root@node1 ~]# mdadm --zero-superblock /dev/sdb5
[root@node1 ~]# mdadm --zero-superblock /dev/sdb6
[root@node1 ~]# mdadm --zero-superblock /dev/sdb7
[root@node1 ~]# reboot
![Command (m for help): t
Partition number (1,5-8, default 8): 7
Hex code (type I to list all codes): Se
Changed type of partition "Linux raid autodetect to
Command (m for help): t
Partition number (1,5-8, default 8): 6
Hex code (type I to list all codes): Se
Changed type of partition "Linux raid autodetect to
Command (m for help): t
Partition number (1,5-8, default 8): 9
Hex code (type I to list all codes): Se
Changed type of partition "Linux raid autodetect to
Command (m for help): p
Disk /dev/sdb: 16.1 GB, 16106127360 bytes, 31457280
Units sectors of 1% 512 512 bytes
Sector size (logical/physical): 512 bytes / 512 byte
1/0 size (minimum/optimal): 512 bytes / 512 bytes
Disk label type: dos
Disk identifier: Oxabd3676%
Device Boot Ri¥tad 13313] Blocks
/dev/sdbl 2048 EIR EVV] ERM ELAN
/dev/sdbh EIETS Fav 1048576
/dev/sdbé 2103296 EVAR EY LEE RYEY
/dev/ sdb 4202496 6299647 1048576
/dev/sdb8 6301696 8398847 1048576
AR ARINIPY
AR ARINIPY
AR ARINIPY
sectors
X81
H
Ge
Ge
Ge
Ge
System
LVM'
LVM'
LVM'
Extended
Linux
Linux
Linux
Linux
LVM
LVM
LVM
LVM](https://contents.bebee.com/users/id/ZOS5h63dbee61e7dc1/article/migrate-raid-disks-to-lvm-4iXM9slDksmb/k5PQy.png)
Changed type of partition 'Linux raid autodetect' to 'Linux LVM'
[root@node1 ~]# fdisk /dev/sdb
![[rootdnodel ~]§ partprobe
[root@nodel ~]1# pvereate /dev/sdbb /dev/sdb6 /dev/sdbi
Physical volume "/dev/sdbH" stully created.
Physical volume "/dev/sdbé" stully created.
Physical volume "/dev/sdbi" stully created.
[root@nodel ~]§
[root@nodel ~]# vgextend vgl /dev/sdbd /dev/sdbe /dev/sdbl
Volume group "vgl" successfully extended
[root@nodel ~]§
[root@nodel ~]1# vagdisplay vgl
--- Volume group ---
ASI BY 18 (Zeal
System 1D
Format. [RG
Metadata Areas 4
Metadata Sequence Noo 3
NSRP YSTEe TE read/write
VG Status [SEPIA NS
MAX LV 0
Cur LV I!
Open LV 0
Max PV 0
Cur pV 4
Act. PV El]
VCR PAS 3.98 GiB
[HEPA 4.00 MiB
ESI INO) 1020
Alloc PE / Size 22% / 900.00 MiB
Free PE / Size 795 / <3.11 GiB
\CINeIeR EY] 2Fxw6C-KANT-KPmN=-1{Qm | -F 1 pW-mhCF-qdJmFD](https://contents.bebee.com/users/id/ZOS5h63dbee61e7dc1/article/migrate-raid-disks-to-lvm-4iXM9slDksmb/becZH.png)
[root@node1 ~]# partprobe
[root@node1 ~]# pvcreate /dev/sdb5 /dev/sdb6 /dev/sdb7
[root@node1 ~]# vgextend vg1 /dev/sdb5 /dev/sdb6 /dev/sdb7
[root@node1 ~]# vgdisplay
![[root@nodel ~]1# lvextend -1, +36 /dev/vgl/lvl
Size of logical volume vgl/1lvl changed from 900.00 MiB (225 extents) to <3.88 GiB (993 extents).
Logical volume vgl/lvl successfully resized.
[root@nodel ~]§
[root@nodel ~]§ xis growts /dev/vgl/livl
xts growfs: /dev/vgl/lvl is not a mounted XFS filesystem
[root@nodel ~]§](https://contents.bebee.com/users/id/ZOS5h63dbee61e7dc1/article/migrate-raid-disks-to-lvm-4iXM9slDksmb/Mkuts.png)
[root@node1 ~]# lvextend -L +3G /dev/vg1/lv1
[root@node1 ~]# xfs_growfs /dev/vg1/lv1
![[root@nodel ~]# vad
Volume group
[ETSY
NE ZN
System 1D
Ens [Re
Metadata Areas 1
Metadata Sequence Noo 4
VG Access [REVO Tae Rn
NERY [REP
EEO 0
Cur LV 1
Open LV 0
EET 0
[Sa 1
Fa 1
A'¢ [Rds] 3.98 1B
PE Size ERI
FIP 1020
[RT AA Tes LERNER BTR)
[TUT AE IP 21 7 108 EHS
PERT 2¥xwébe KANT KPmN Om) FlpW mhCF qddmbD
[root@nodel ~]1# lvdisplay /dev/vgl/lvl
Logical volume
[ARON Estate!
LV Name 181
IH
MW: 7S xBpd 11rd ZJBS elym Koyk MUUSqg/
Tate
LV Write Acc
LV Creation host, time nodel, FRVETET
LV Status EARS Eh
[sa 0
IV Size PETIT
Current LE ELE
ETL RTTe 1
Allocation inherit
Read ahead sectors ETtIES
currently set to [ICV
Block device 2](https://contents.bebee.com/users/id/ZOS5h63dbee61e7dc1/article/migrate-raid-disks-to-lvm-4iXM9slDksmb/ucJ5N.png)
[root@node1 ~]# lvdisplay
![[root@nodel ~]# df h
RE8aY
JH
JH
JH
JH
JH
JIE]
PEI)
er/centon root
EVE
8 HE) i]
[root@nodel ~]# mount /dev/vgl/lvl /1vl
[root@nodel ~]# df h
Avail
JH
JH
JH
JH
116
ERC]
PEI)
Used
F1 lesyntem Size Used Avail
devtmpt [RTS 1.46
3 JH 01.46
3 1.4G 6.6M 1.46
STR [TH 01.46
/dev/mapper/centos root 136 1.66 116
LEVEE 1014M 195M 820M
SIR PEI) 0 280M
fdev/mapper/vgl lvl EER] EEL BET]
[rootBnodel ~]1# xfs growfs /dev/vgl/lvl
neta data /dev/mapper/vgl lvl [EPI
HEPA
!
SET buize 4096
ERUEE aN
ELIE REET buize 4096
IE) internal buize 4096
sectsz 512
SENSE TER TTI extaz 4096
data blocks changed from 230400 to 1016832
Mounted on
/dev
/dev/shm
/run
EE Ey ran
a
/boot.
/run/user/0
% Mounted on
PE
rae
am
RET
li
/boot.
rss
Jase
ageount 4, agmize 51600 blks
EE REFIT
LRT THe [LEER
blocks 230400, imax
swidth 0 blks
TA I TR a)
blocks 855, version 2
sunit 0 blks, lazy count 1
blocks 0, rtextents](https://contents.bebee.com/users/id/ZOS5h63dbee61e7dc1/article/migrate-raid-disks-to-lvm-4iXM9slDksmb/IWSTS.png)
[root@node1 ~]# df -h
[root@node1 ~]# mount /dev/vg1/lv1 /lv1
[root@node1 ~]# xfs_growfs /dev/vg1/lv1
![[root@nodel ~]1# pvs
IY VG Fmt. Attr PSize |RSS
/dev/sda? centos lvm? a-- <14.00qg 0
/dev/sdb8 val lvm? a-- 1020.00m 120.00m
[root@nodel ~1# lvdisplay /dev/vgl/lvl
--- Logical volume ---
LV Path /dev/vagl/lvl
LV Name [al
NEES (Zeal
LV UuID GeaHuK=-AWnz-oWi i -RVeN-Ri Fv-{ Tt.S-Qreby0
LV Write Access read/write
LV Creation host, time nodel, 2022-12-19 16:48:39 +0530
LV status available
LES STs I!
LV Size 900.00 MiB
Current. LE 225
Segments 1
Allocation inherit
Read ahead sectors ELIAS)
- currently set to ERM
Block device 25312
[root@nodel ~1# df -h | grep lvl
/dev/mapper/vgl-1vl CENA] 33M 865M 4% [lvl
[root@nodel ~]§ [ |](https://contents.bebee.com/users/id/ZOS5h63dbee61e7dc1/article/migrate-raid-disks-to-lvm-4iXM9slDksmb/75mWo.png)
[root@node1 ~]# df -h
![[root@nodel ~]§ lvcereate - 100M
RRPAS snapshot. --name
Logical volume “snap lvl" created.
[root@nodel ~1§ lvs
LV VG Attr JIS IP2S! Pool Origin Data%
[aeTeld centos -—wi-ao---- <12.50g
swap centos —wi-ao---- J ISYOLS |
v1 NZS owi=-aos--- 900.00m
snap lvl vgl swi-a-s--- 100.00m [Ra 0.00
[root@nodel ~1# df -h | grep lvl
/dev/mapper/vgl-1vl CENA] 33M 865M 4% [lvl
[root@nodel ~]§ [ |
snap
[SANE
Move
lvl /dev/vgl/ivl
Log Cpy%Sync Convert](https://contents.bebee.com/users/id/ZOS5h63dbee61e7dc1/article/migrate-raid-disks-to-lvm-4iXM9slDksmb/89i4X.png)
LVM snapshot and restore data of lv1 logical volume
[root@node1 ~]# pvs
[root@node1 ~]# lvdisplay /dev/vg1/lv1
[root@node1 ~]# df -h | grep lv1
![[root@nodel ~)§& 1s [lvl
anaconda-ks.ctg dirl dir? filedata libaudit.so.l libaudit.so.1.0.0
[root@nodel ~1# df -h | grep lvl
/dev/mapper/vgl-1vl CENA] 33M 865M 4% [lvl
[root@nodel ~18](https://contents.bebee.com/users/id/ZOS5h63dbee61e7dc1/article/migrate-raid-disks-to-lvm-4iXM9slDksmb/ev0B4.png)
Create lvm snapshot for the disk /dev/vg1/lv1 to backup lv1 data
[root@node1 ~]# lvcreate --size 100M --snapshot --name snap_lv1 /dev/vg1/lv1
![[root@nodel ~]1# dmsctup status
vgl-snap lvl-cow: 0 204800 linear
vgl-lvl-real: 0 1843200 linear
vgl-snap lvl: 0 1843200 snapshot. 72/204800 16
vgl-1vl: 0 1843200 snapshot-origin
centos-swap: 0 3145728 linear
centos-root: 0 26206208 linear
[root@nodel ~]§](https://contents.bebee.com/users/id/ZOS5h63dbee61e7dc1/article/migrate-raid-disks-to-lvm-4iXM9slDksmb/ZceCi.png)
We have some files on /lv1 mount point which is currently available in the lvm snapshot.
![root@nodel ~]¢# df -h | grep lvl
/dev/mapper/vgl-1vl CENA] 33M 865M 4% [lvl
root@nodel ~]#
root@nodel ~]# umount. /1vl
root@nodel ~]#
root@nodel ~]1# mount. /dev/vgl/snap lvl /mnt
root@nodel ~]#
root@nodel ~]# 1s
anaconda-ks.ctg ZFS (1).tar.gz zis-release.el’ d.noarch.rpm zisrpms
root@nodel ~]#
root@nodel ~]# umount. /mnt.
root@nodel ~]#
root@nodel ~]1§ mount. /dev/vgl/lvl /lvl
root@nodel ~]#
root@nodel ~]# 1s
anaconda-ks.ctg ZFS (1).tar.gz zis-release.el’ d.noarch.rpm zisrpms
root@nodel ~]#
JANN
JANN
tar
tar
SFA
SFA](https://contents.bebee.com/users/id/ZOS5h63dbee61e7dc1/article/migrate-raid-disks-to-lvm-4iXM9slDksmb/7FmO9.png)
We can use dmsetup status to check snapshot metadata sectors.
![[root@nodel ~]# umount. /1vl
[root@nodel ~]# mount. /dev/vgl/lvl /mnt
[root@nodel ~1# df -h | grep lvl
/dev/mapper/vgl-1vl CENA] 33M 865M 4% /mnt.
[root@nodel ~]§
[root@nodel ~]# tar -cvzi snap lvl.tag.gz /mnt/
tar: Removing leading */' from member names
/mnt./
/mnt./libaudit.so.l
/mnt./libaudit.so.1.0.0
/mnt./anaconda-ks.cfqg
VATA NRE EL
/mnt./dirl/
/mnt./dirl/anaconda-ks.ciqg
EWEN
/mnt./dir?2/anaconda-ks.ctqg
[root@nodel ~1§ clear
[root@nodel ~18](https://contents.bebee.com/users/id/ZOS5h63dbee61e7dc1/article/migrate-raid-disks-to-lvm-4iXM9slDksmb/Af2eq.png)
Check data on the snapshot after unmounting actual mount point before mounting snapshot volume.
[root@node1 ~]# df -h | grep lv1
[root@node1 ~]# umount /lv1
[root@node1 ~]# mount /dev/vg1/snap_lv1 /mnt
[root@node1 ~]# umount /mnt
[root@node1 ~]# mount /dev/vg1/lv1 /lv1
![[root@nodel ~]§ 1s -1
total 56
—rw------- «1 root root 1227 Dec 16 00:40 anaconda-ks.ctqg
-rw-r--r--. 1 root root 49311 Dec 19 18:23 snap lvl.tag.qgz
drwxr-xr-x. 3 root. root 35 Dec 19 16:10 zisrpms
[root@nodel ~1§ 1s](https://contents.bebee.com/users/id/ZOS5h63dbee61e7dc1/article/migrate-raid-disks-to-lvm-4iXM9slDksmb/mdQnF.png)
[root@node1 ~]# umount /lv1
[root@node1 ~]# mount /dev/vg1/lv1 /mnt
[root@node1 ~]# df -h | grep lv1
[root@node1 ~]# tar -cvzf snap_lv1.tag.gz /mnt/
![t@nodel ~1# lveonvert --mergesnapshot. /dev/vgl/snap lvl
Delaying merge since origin is open.
Merging of snapshot vgl/snap lvl will occur on next activation of vgl/lvl.
-oot@nodel ~|§
@nodel ~]¢# lvchange --refresh vgl/lvl
t@nodel ~]§
@nodel ~]§ df -h
Size Used Avail Us Mounted on
devtmpis |S 0 1.46 /dev
tmpfs |S 0 1.46 /dev/shm
tmpfs 1.46 8.6M 1.4G /run
tmpfs |S 0 1.46 /sys/ts/cgroup
/dev/mapper/cent 13G 1.86 IRIS 1s
/dev/sdal 1014 195M 820M /boot.
tmpfs 280M [ORS T0I | /run/user/0
/dev/mapper/vgl-1vi 897M RII ETRY FALLS
[root@nodel ~1§ 1s /mnt
anaconda-ks.ctfqg
[root@nodel ~1§ lvs
WV VG [XEN Lsize Pp
root. cent -wi-ao---- <12.50qg
swap centos -—wi-—¢ --- J RRSTOLe |
[Ra (7601 Owi =: ERIM IONT0) 1)
[root@nodel ~)§ [ |
rl dir? filedata libaudit.so.1l libaudit.so.1.0.0
Origin Data% Metas Mc
¢ Log Cpy%Sync Convert](https://contents.bebee.com/users/id/ZOS5h63dbee61e7dc1/article/migrate-raid-disks-to-lvm-4iXM9slDksmb/mu7DJ.png)
[root@node1 ~]# ls

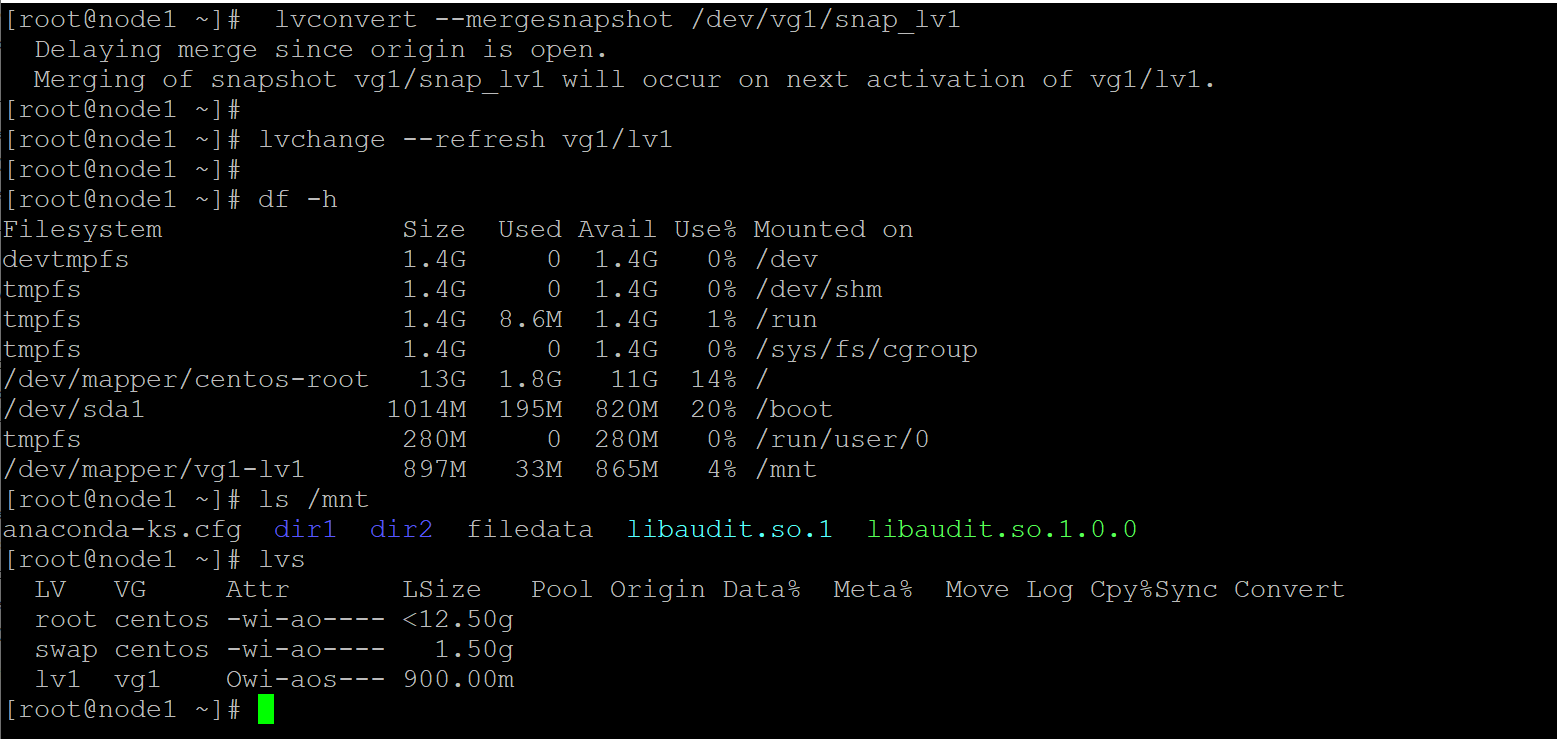
Restore snapshot to the original logical volume.
[root@node1 ~]# lvconvert --mergesnapshot /dev/vg1/snap_lv1
We can refresh the logical volume for it to reactivate using the latest metadata using “lvchange”
[root@node1 ~]# lvchange --refresh vg1/lv1
[root@node1 ~]# ls /mnt
Now lvsnapshot is removed and merged with the original logical volume.
You may be interested in these jobs
-

Application Representative Software Sales Representative
Found in: beBee S2 IN - 1 day ago
timesjobs United States of America (USA), India Full time· We are seeking an Application Representative who will be responsible for selling the companys products and services. The Application Representative will spend considerable time talking with prospects, customers and partners to uncover sales opportunities. When found, the Appli ...
-
Ruby on Rails Developer Full-Time
Found in: Talent IN 2A C2 - 12 hours ago
HyreFox Consultants Jaipur, India Full timeWe are looking for a Ruby on Rails developer responsible for managing the interchange of data between the server and the users. Your primary focus will be development of all server-side logic, definition and maintenance of the central database, and ensuring high performance and r ...
-
Marketing Assistant
Found in: Talent IN 2A C2 - 5 days ago
Amwaves Wellness Mumbai, IndiaMarketing support executive - Andheri West · Location - Near D.N Nagar Metro station - Andheri West Mumbai. · Candidates should be Graduate with a minimum of 1 year of Experience of sales and marketing communications. · Efficient with spoken English · Excellent interpersonal and ...

Comments